Purchase Orders
There are a few types of Purchase Orders in the system that deal with different types of purchases such as Normal, Processor, Blanket, and Non-Blanket.
Normal: These orders buy material directly or indirectly consumed in the Manufacturing process and/or for maintaining Plant Equipment. Normal Purchase Orders also cover non-stock Items, and M.R.O. Items as well.
Processor: These orders are strictly for purchasing Outside Processes where Manufactured Items are sent to another facility for further processing.
Blanket Order: These orders are always Active/Open even if all Items on the P/O have been received and there are no Items with something due.
Non-Blanket Order: These orders will cease to be Active/Open after all Items have received.
Both order types (Normal and Processor) may be a Blanket order by selecting the Blanket Order checkbox on a Purchase Order screen. This is only available when a Purchase Order is created or if the Purchase Order does not have any open Items and there are no Receipts against it.
Note
It is important to remember that a Normal/Process order describes what is being purchased, whether an object or a function/operation, whereas a Blanket/Non-Blanket order dictates whether the order closes (becomes In-Active) after all Items have been received.
Note
The Process must be a Blanket in order for these items to be in the lookup window for selection and assigned to a Packing Slip
To view all available Purchase Orders in the system, navigate to the  tab and click on the
 ![]() icon.
The Purchase Orders screen will be displayed.
icon.
The Purchase Orders screen will be displayed.
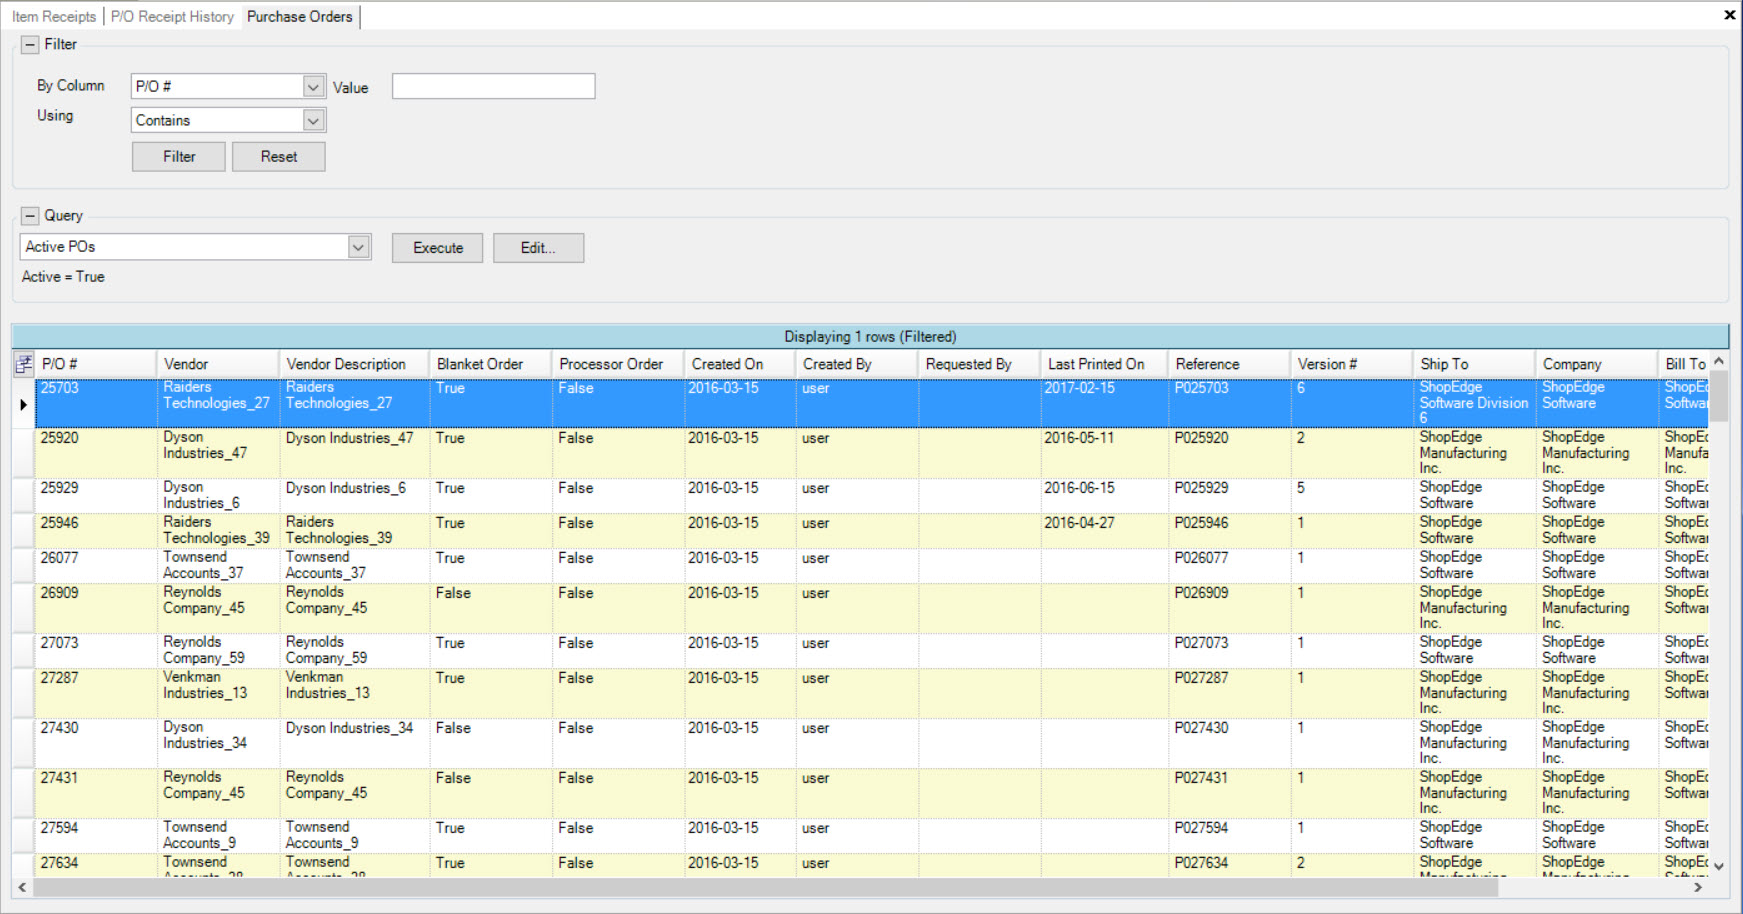
Users will be able to view all available Purchase Orders in the system with details such as the P/O #, Vendor, Vendor Description, Blanket Order, Processor Order, Created On date, Created By, Requested By, Last Printed On date, Reference, Version #, Ship To, Company, Bill To, and whether or not it is Active.
Creating a Purchase Order
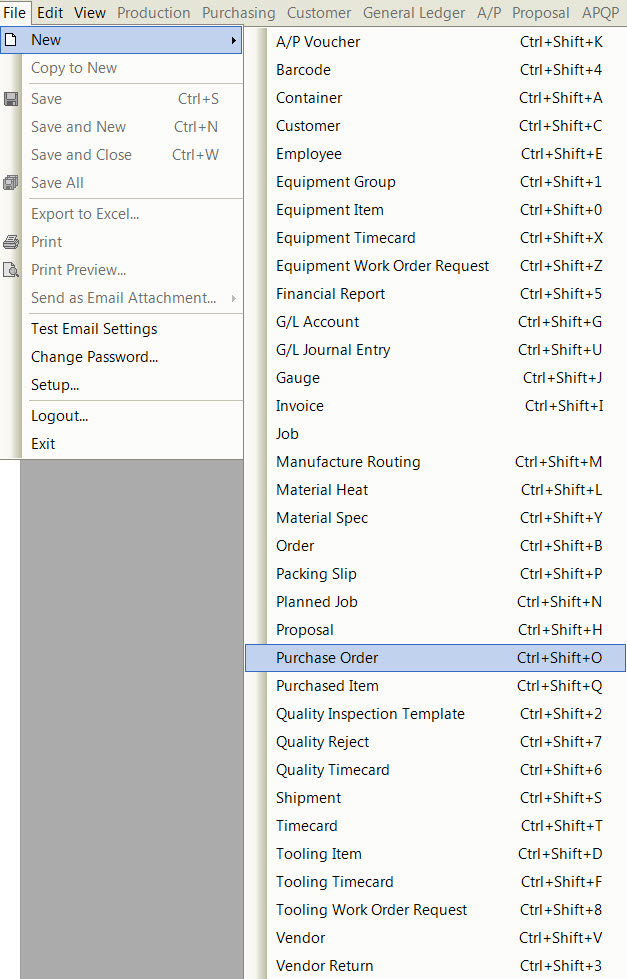
There are three different ways to add a new Purchase Order to the system. The first way is to press the Ctrl + Shift + O keys. The second way is to navigate to File > New > Purchase Order.
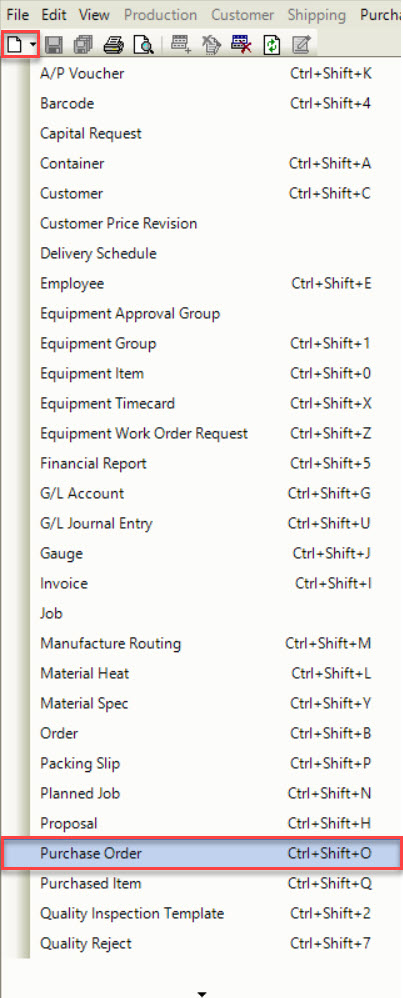
The last way is to click on the  button, and then on the Purchase Order option.
All of these three options will open a new Purchase Order screen.
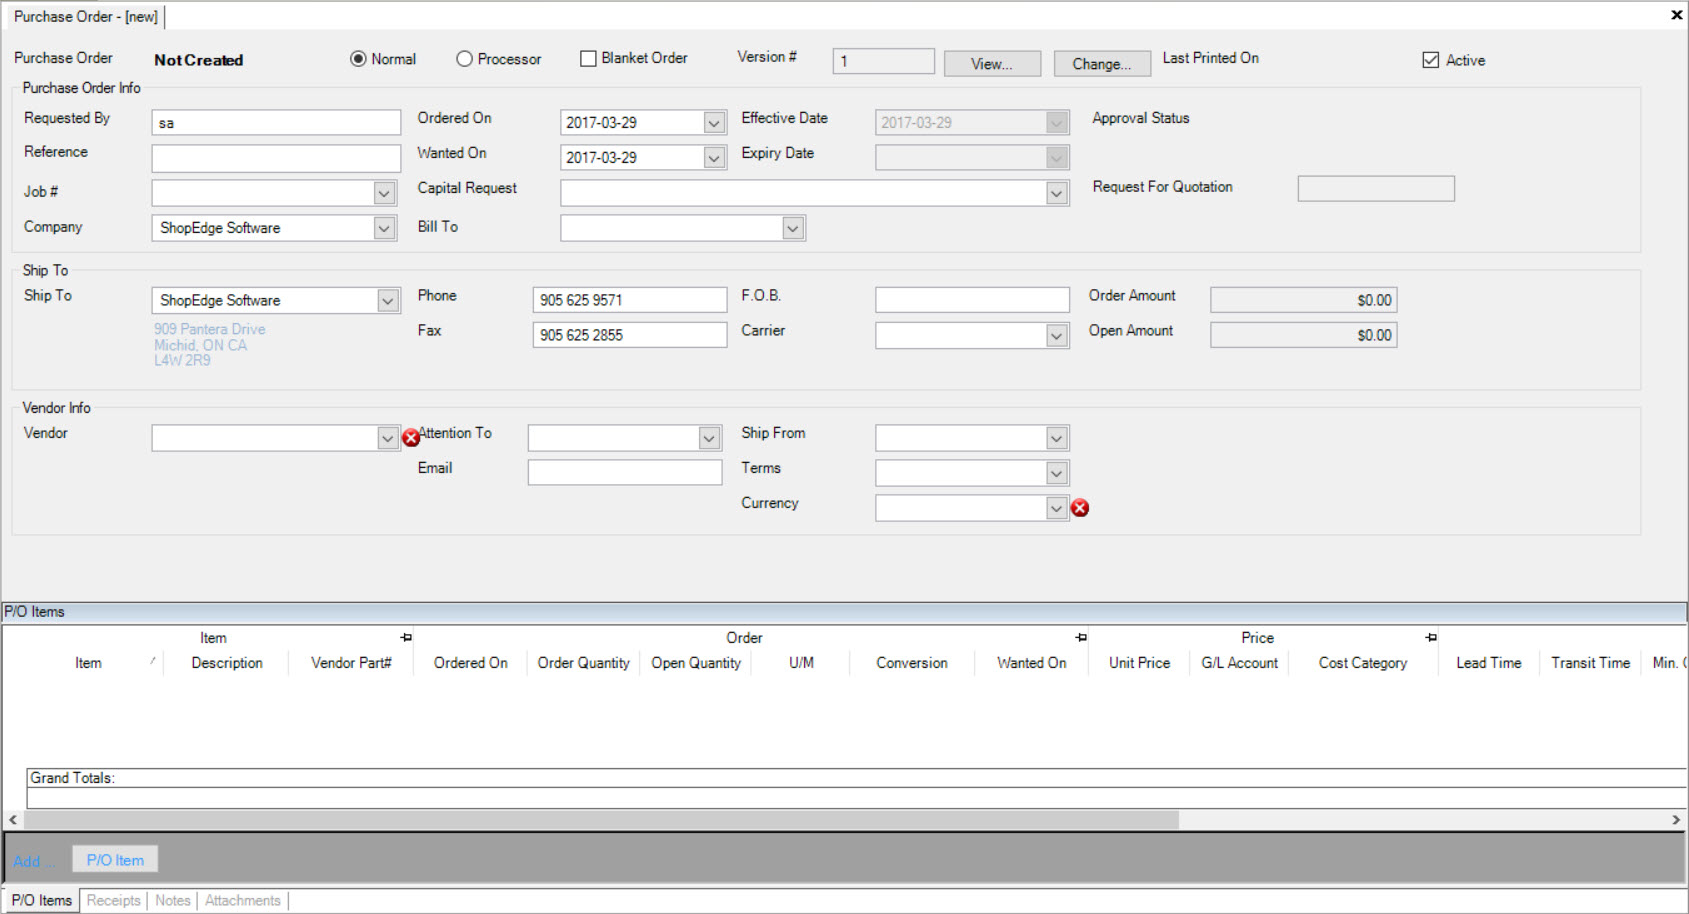
Users must select whether the new Purchase Order is Normal or Processor, as well as selecting or de-selecting the Blanket Order checkbox.
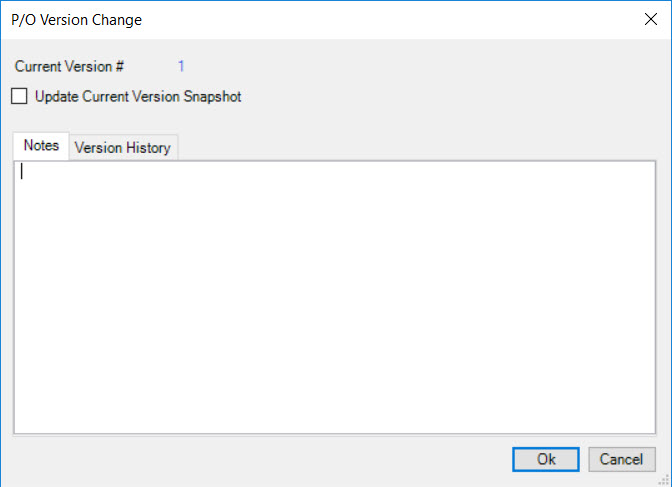
The Version # will automatically default to 1. Users can click on the  button. The P/O Version Change window will appear where users can add or view Notes, and
view the Version History (if available). To update the current Version Snapshot, select the Update Current Version Snapshot checkbox. Then, click on the
  button to
close the window.
Note
The  button allows users to change the Version # once the new Purchase Order has been saved.
The new Purchase Order will automatically default to Active but users have the ability to de-select the checkbox.
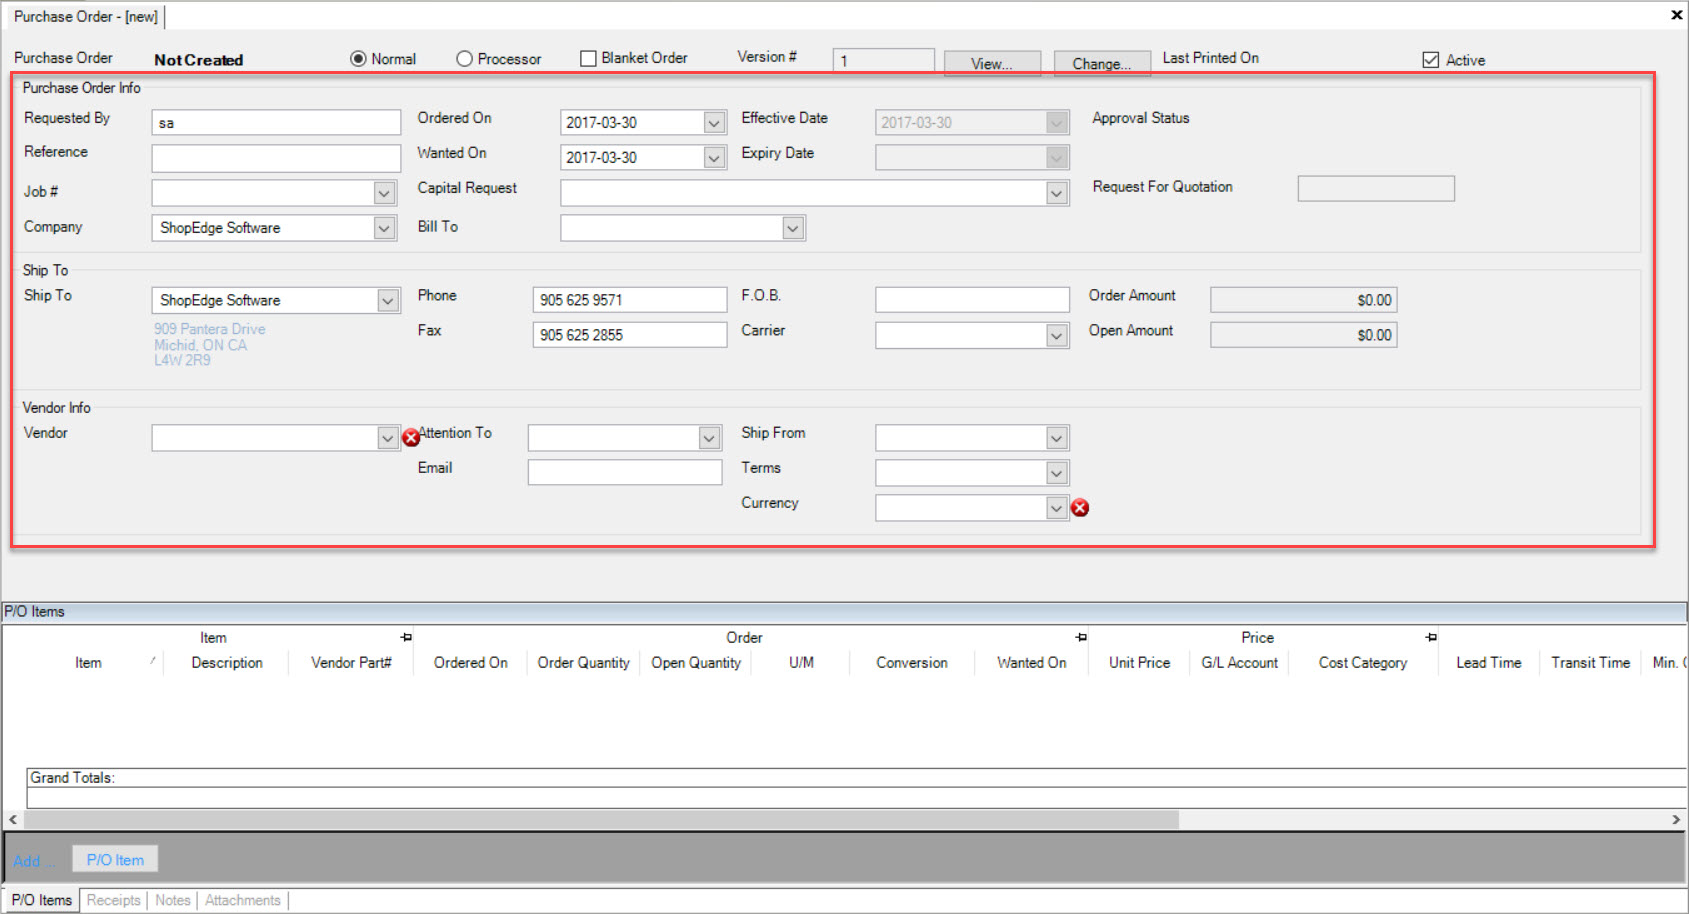
Next, users must enter in the information for each header section: Purchase Order Info, Ship To, and Vendor Info. The mandatory fields must be completed before a user is able to perform a save.
Adding a Purchase Order Item
To add a Purchase Order (P/O) Item to a Purchase Order, make sure to select the  tab located at the bottom of the screen.
Then, click on the  button located at the bottom of the screen. A new row will be added where users must enter in the necessary fields such as the Item, Description,
Ordered On date (which will automatically default to the current date), Order Quantity, Open Quantity, Unit of Measure, Unit Price, and the G/L Account.

Note
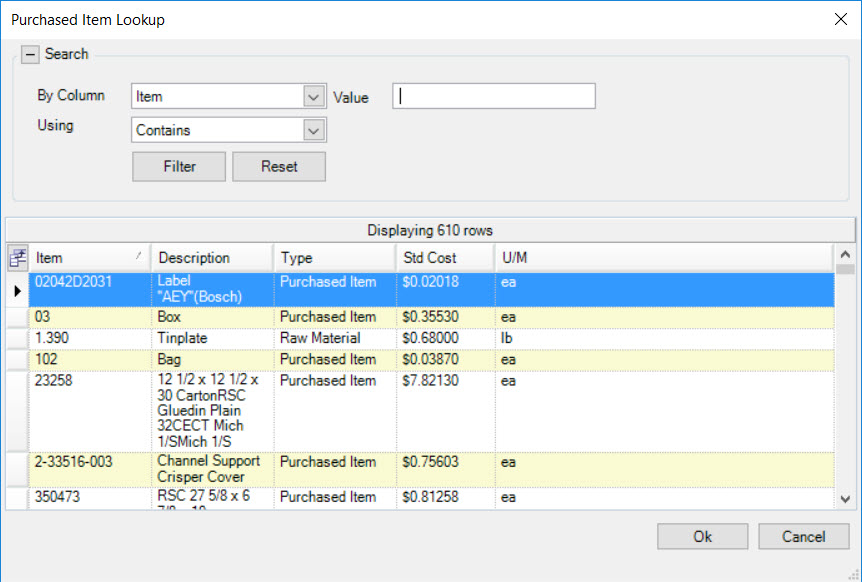
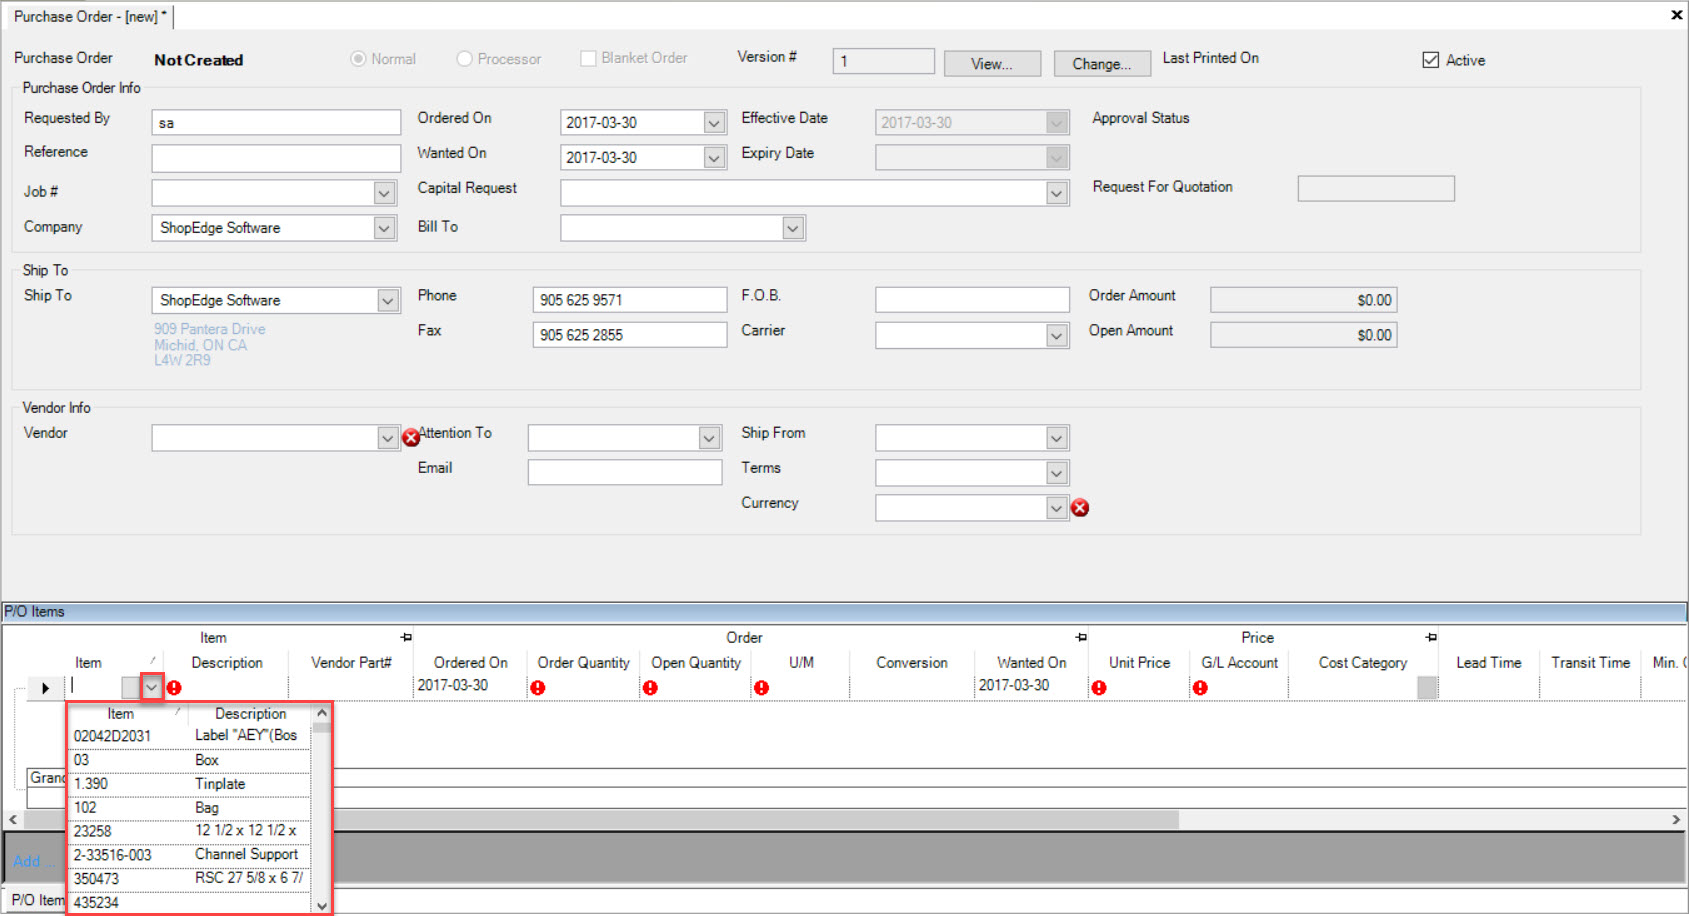
When entering in the Item, users have three options. The first option is to manually enter in the Item. The second option is to click on the  which opens the Purchased Item Lookup window. Here users can highlight the appropriate Item or Items and click on the
  button and the Item will be added. The last way is to use the available drop-down menu to select the appropriate Item.
Once the necessary information for the P/O Item is entered in, make sure to save your changes before exiting the screen.
Opening a Purchased Item
When a P/O Item has been added to a Purchase Order, users have the ability to view the Purchased Item from the Purchase Order detail screen.
To do so, navigate to the  tab and click on the
 ![]() icon. The Purchase Orders screen will be displayed.
icon. The Purchase Orders screen will be displayed.

Double-click on the row of the appropriate Purchase Order you wish to view a Purchased Item from.
The Purchase Order detail screen will appear.
Make sure to select the  tab is selected, located at the bottom of the screen.
Locate the Item you wish to view and right-click on the appropriate row. A menu will appear where users can select the Open Purchased Item option.

The Purchased Item detail screen will appear.
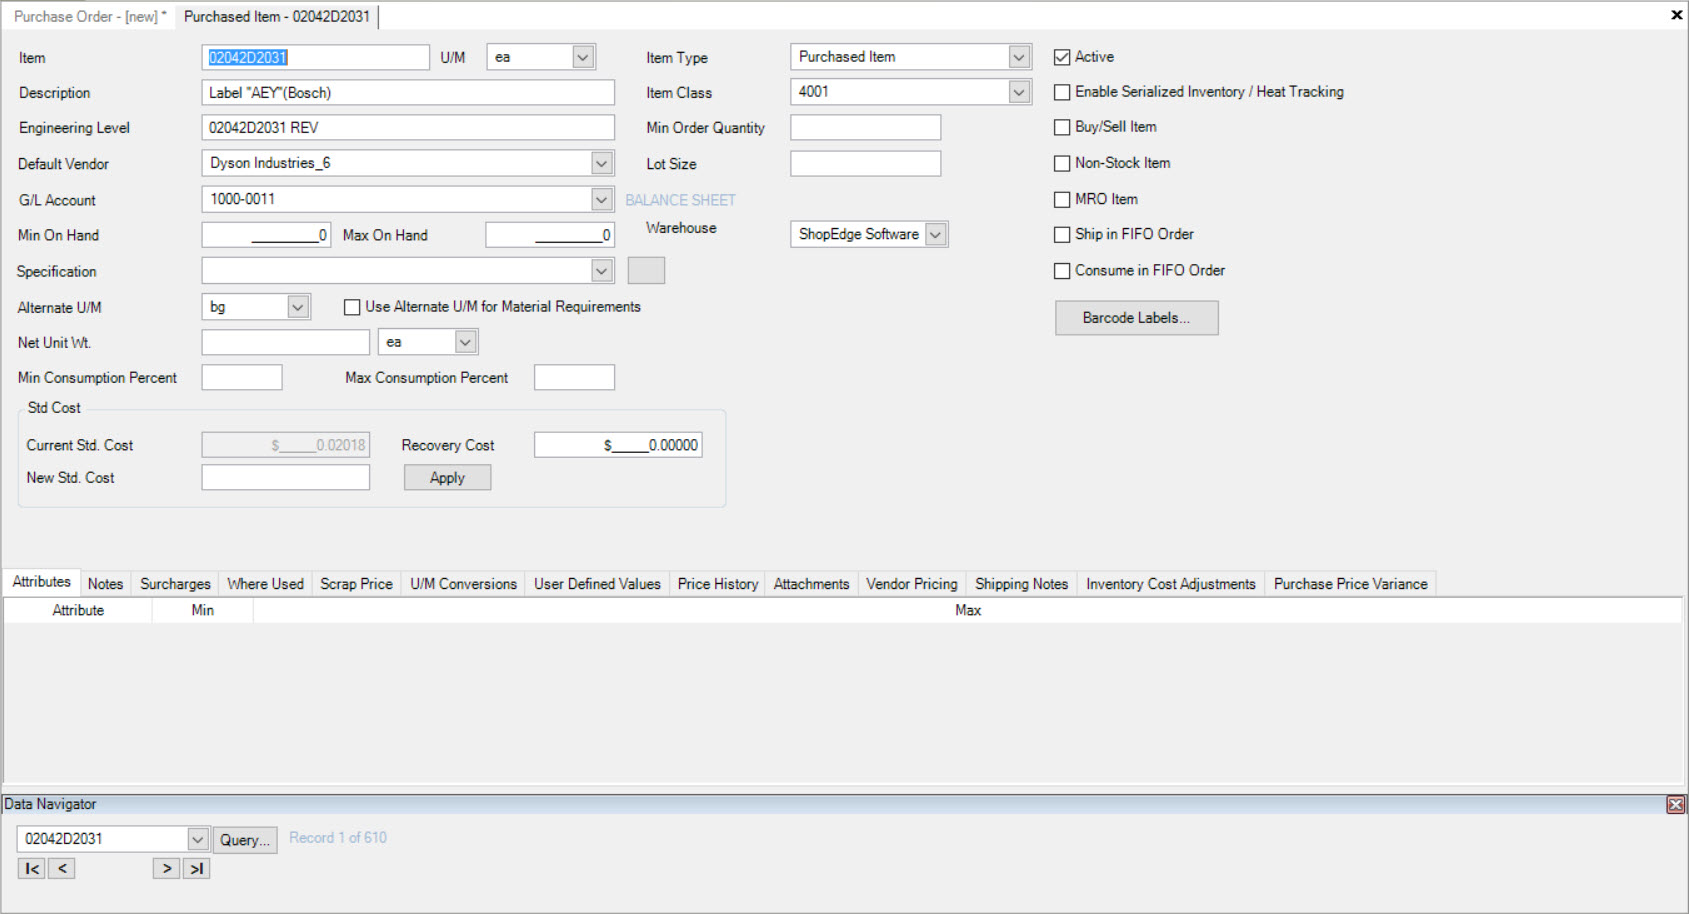
Note
If users wish to make changes to a Purchased Item, please navigate to Purchasing > Purchased Items for more details.
Importing a file to Purchased Item
When a P/O Item has been added to a Purchase Order, users have the ability to select a file to import from the Purchase Order detail screen.
To do so, navigate to the  tab and click on the
 ![]() icon. The Purchase Orders screen will be displayed.
icon. The Purchase Orders screen will be displayed.

Double-click on the row of the appropriate Purchase Order you wish to view a Purchased Item from.
The Purchase Order detail screen will appear.
Make sure to select the  tab is selected, located at the bottom of the screen.
Locate the Item you wish to import a file to and right-click on the appropriate row. A menu will appear where users can select the Import... option.

The Data Import window will appear.
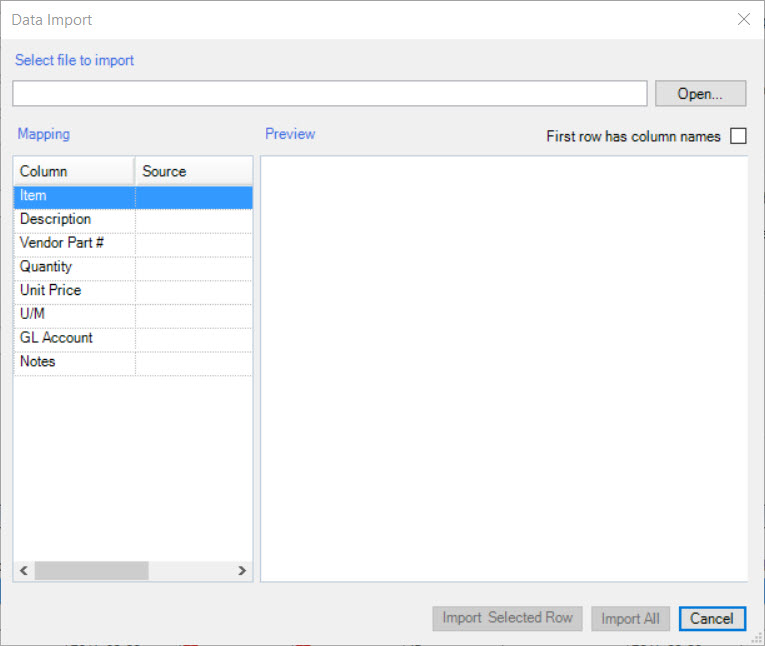
Users must select a file to import by clicking on the  button.
A window will appear where users can select the file from a location on their computer. Once the file is selected, click on the  button.
Once the file has been imported, users must map the information in the left column with the information in the right column. To do so, use the available drop-down menus in the left column to map the information on the right column.
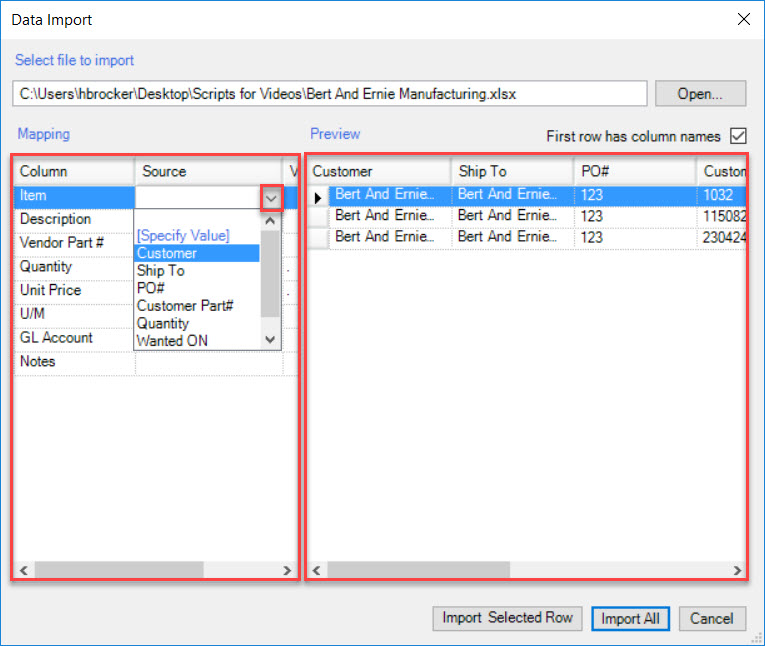
Once the necessary information has been mapped, users have the ability to import selected rows or import all rows.
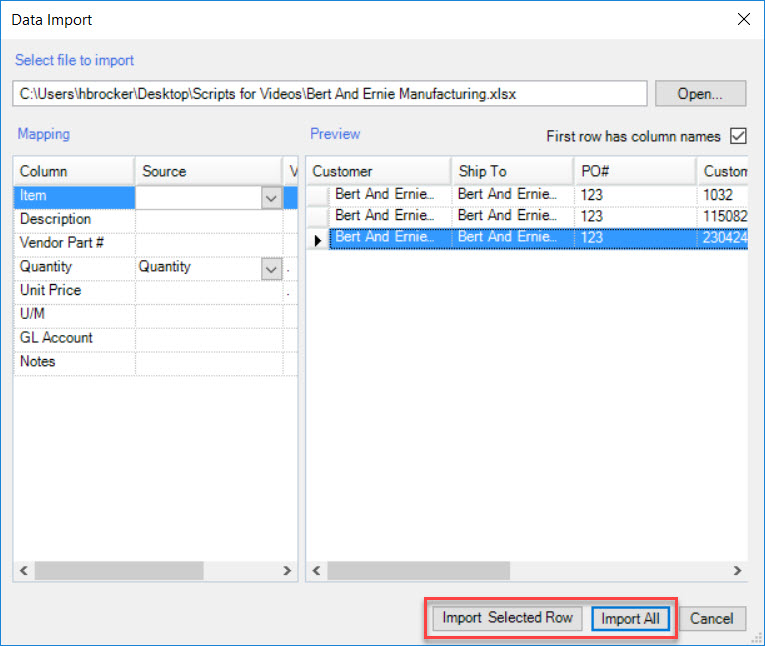
The selected imported information will be added to the Purchase Order detail screen, under the  tab.
tab.
Make sure to save your changes before exiting the screen.
Editing a Purchase Order Item
To edit a P/O Order Item on the Purchase Order detail screen, navigate to the  tab and click on the
 ![]() icon. The Purchase Orders screen will be displayed.
icon. The Purchase Orders screen will be displayed.

Double-click on the row of the appropriate Purchase Order you wish to edit a Purchased Item from.
The Purchase Order detail screen will appear.
Make sure to select the  tab is selected, located at the bottom of the screen.
Locate the P/O Item you wish to edit and make the necessary changes using the available textboxes and drop-down menus.
Once the necessary changes have been made, make sure to save before exiting the screen.
Deleting a Purchase Order Item
To delete a P/O Item from a Purchase Order, navigate to the  tab and click on the
 ![]() icon. The Purchase
Orders screen will be displayed.
icon. The Purchase
Orders screen will be displayed.

Double-click on the row of the appropriate Purchase Order you wish to delete a Purchased Item from.
The Purchase Order detail screen will appear.
Make sure to select the  tab is selected, located at the bottom of the screen.
Locate the P/O Item you wish to delete and highlight the appropriate row. Use your Delete key and when the system prompts you, select Yes.
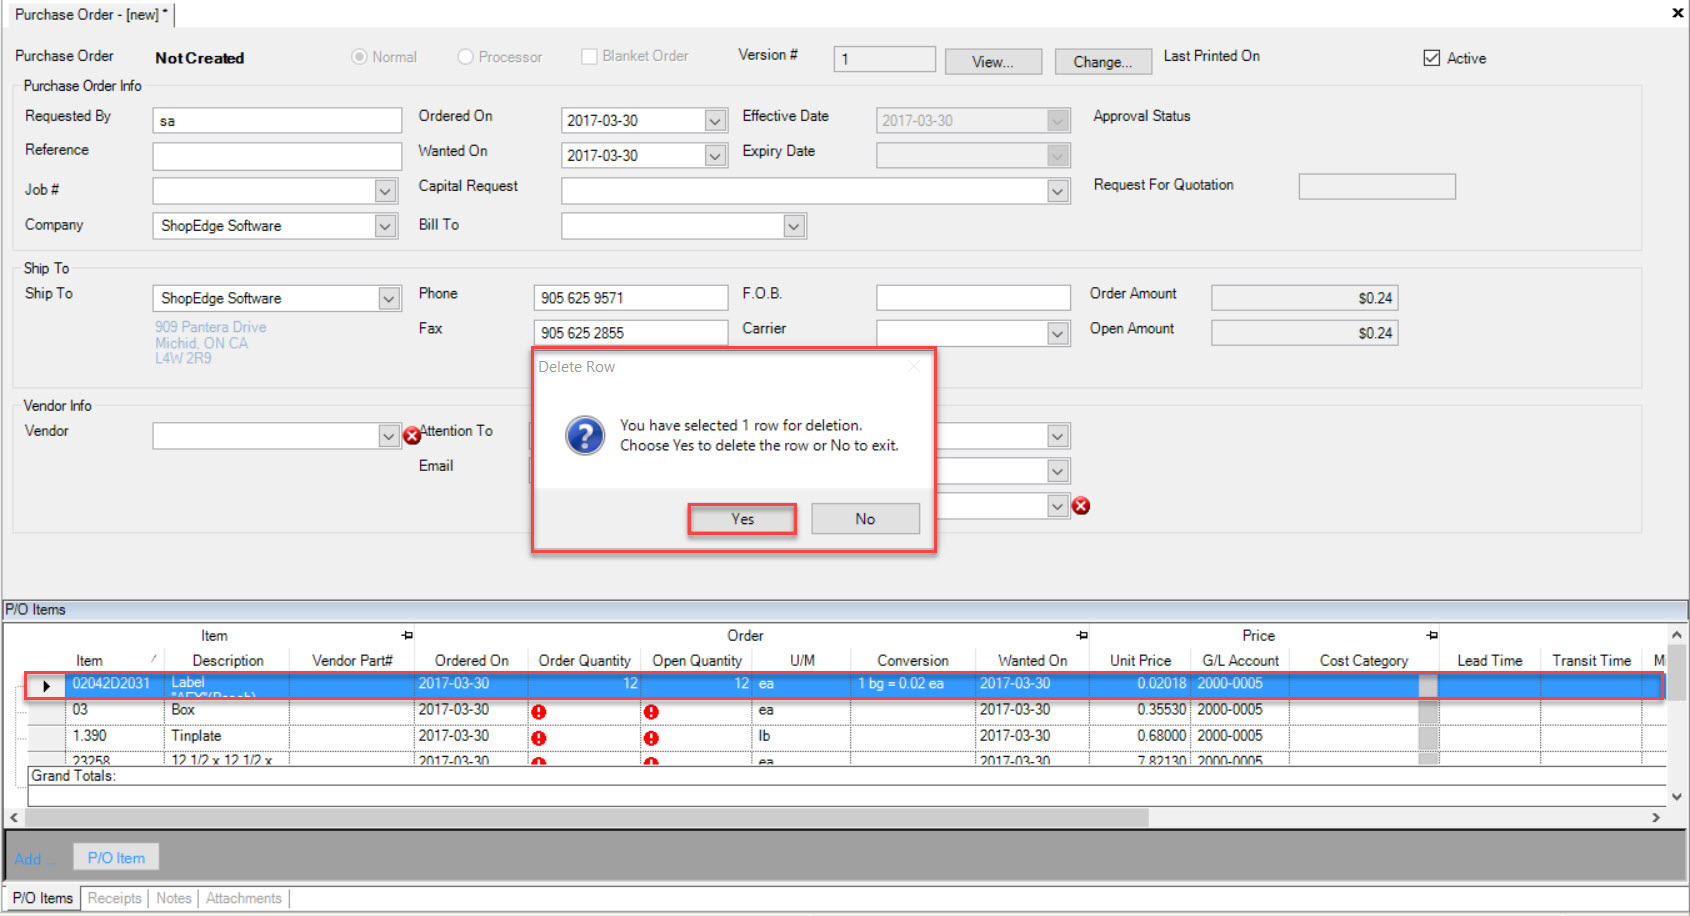
Note
Users have the ability to delete multiple P/O Items at one time by pressing the Shift key and highlighting the rows you wish to delete. Use your Delete key and when the system prompts you, select Yes.
The selected P/O Item(s) will be deleted. Make sure to save your changes before exiting the screen.
Viewing Receipts on a Purchase Order
To view Receipts on a Purchase Order, navigate to the  tab and click on the
 ![]() icon. The Purchase
Orders screen will be displayed.
icon. The Purchase
Orders screen will be displayed.

Double-click on the row of the appropriate Purchase Order you wish to view Receipts for.
The Purchase Order detail screen will appear.
Make sure to select the  tab located at the bottom of the screen.
Users must then select a Start and End date to view Receipts from. Then, click on the  button.
The system will populate the Receipts accordingly.

Adjusting a Purchase Order Receipt
To adjust a Receipt on the Purchase Order detail screen, navigate to the  tab and click on the
 ![]() icon. The Purchase
Orders screen will be displayed.
icon. The Purchase
Orders screen will be displayed.

Double-click on the row of the appropriate Purchase Order you wish to adjust a Receipt for.
The Purchase Order detail screen will appear.
Make sure to select the  tab located at the bottom of the screen.
Users must then select a Start and End date to view Receipts from. Then, click on the  button.
The system will populate the Receipts accordingly.

Locate the Receipt you wish to adjust and right-click on the appropriate row. A menu will appear where users can select the  option.
The Adjust P/O Receipt window will appear.
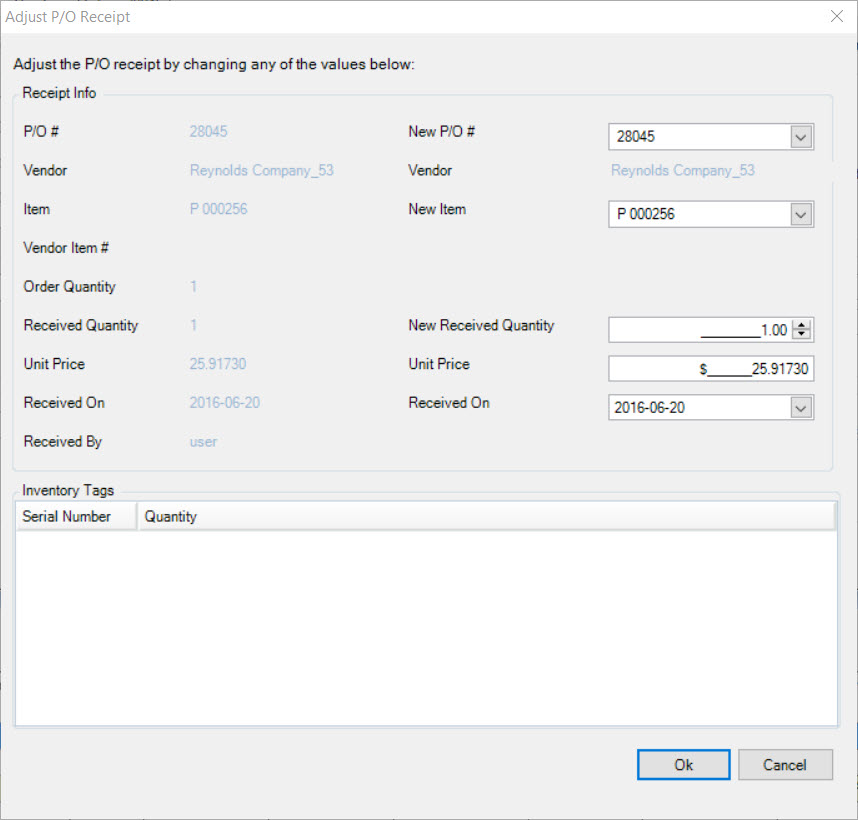
Users can now make the necessary changes to adjust the Receipt such as entering a correct value in the Unit Price textbox. Once the necessary adjustments have been made, click on the
 button.
Then, users must run the Month End Accrual Report again. The adjustments will be made.
Adjusting a Processor Purchase Order Receipt
To adjust a Processor P/O Receipt, navigate to the  tab and click on the
 ![]() icon.
icon.
The Purchase Orders screen will be displayed.

Locate the Purchase Order that you wish to adjust the Receipt for and double-click on the appropriate row. The Purchase Order detail screen will appear. You will notice that it is a Processor P/O Receipt because it will be selected at the top of the screen.
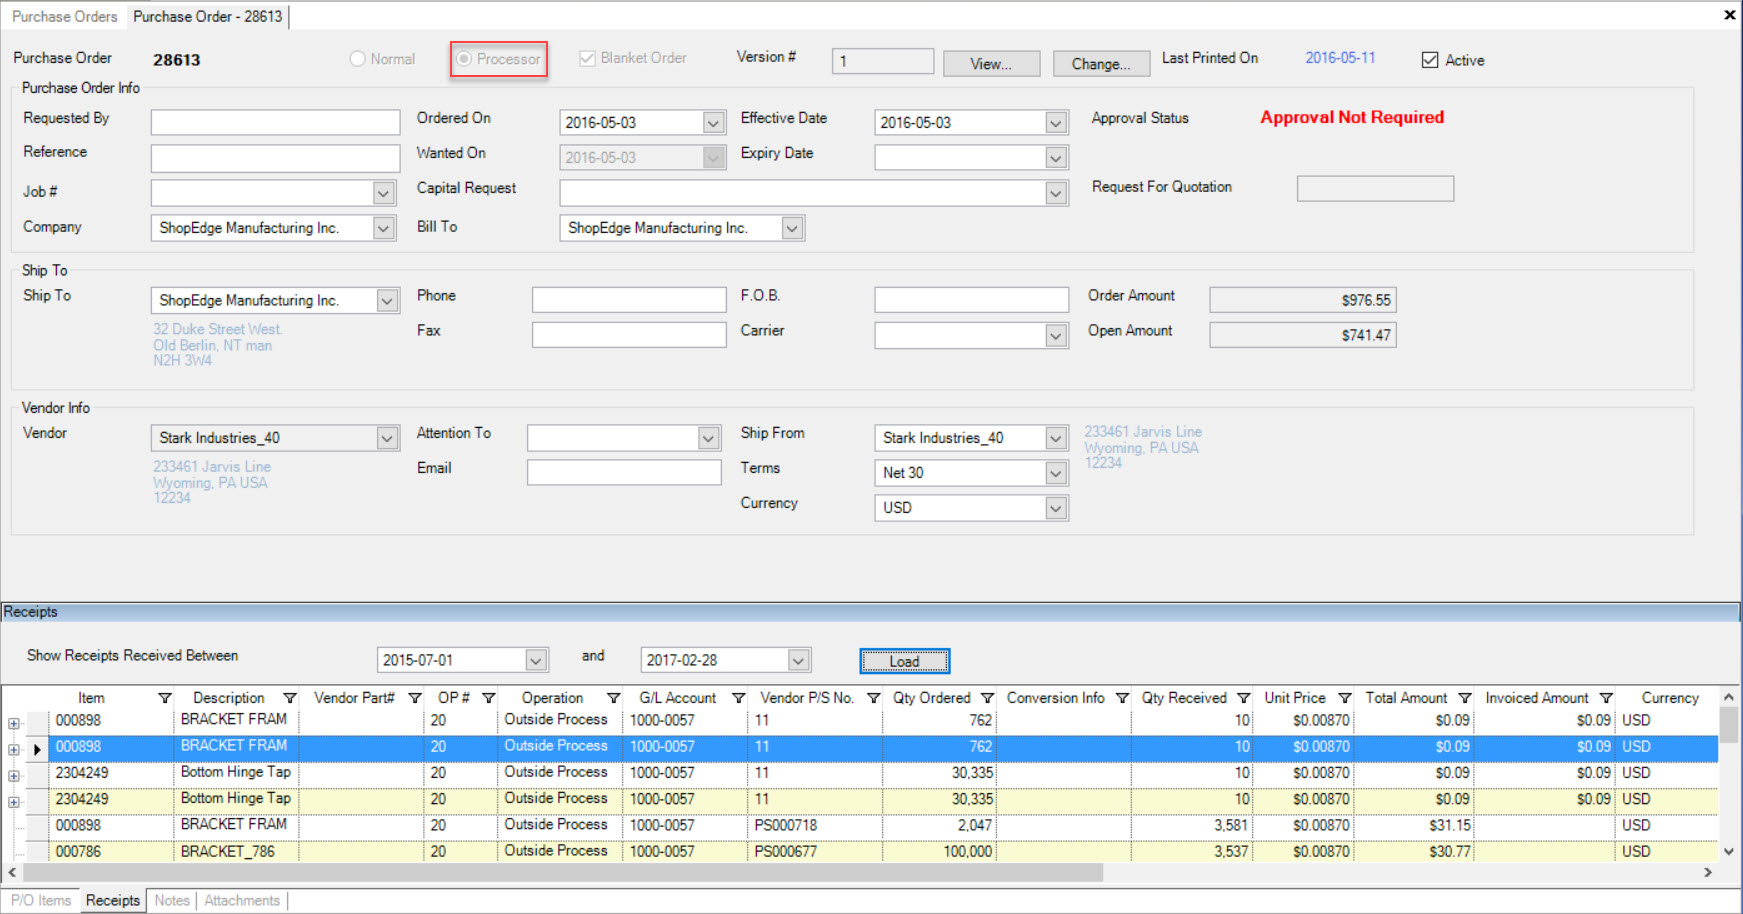
Click on the  tab located at the bottom of the screen.
Enter in a Start and End Date in order for the system to populate the Processor P/O Receipts received between the two dates. Then, click on the  button.
Right-click on the appropriate Processor P/O Receipt that you wish to adjust and select Adjust P/O Receipt from the available menu.
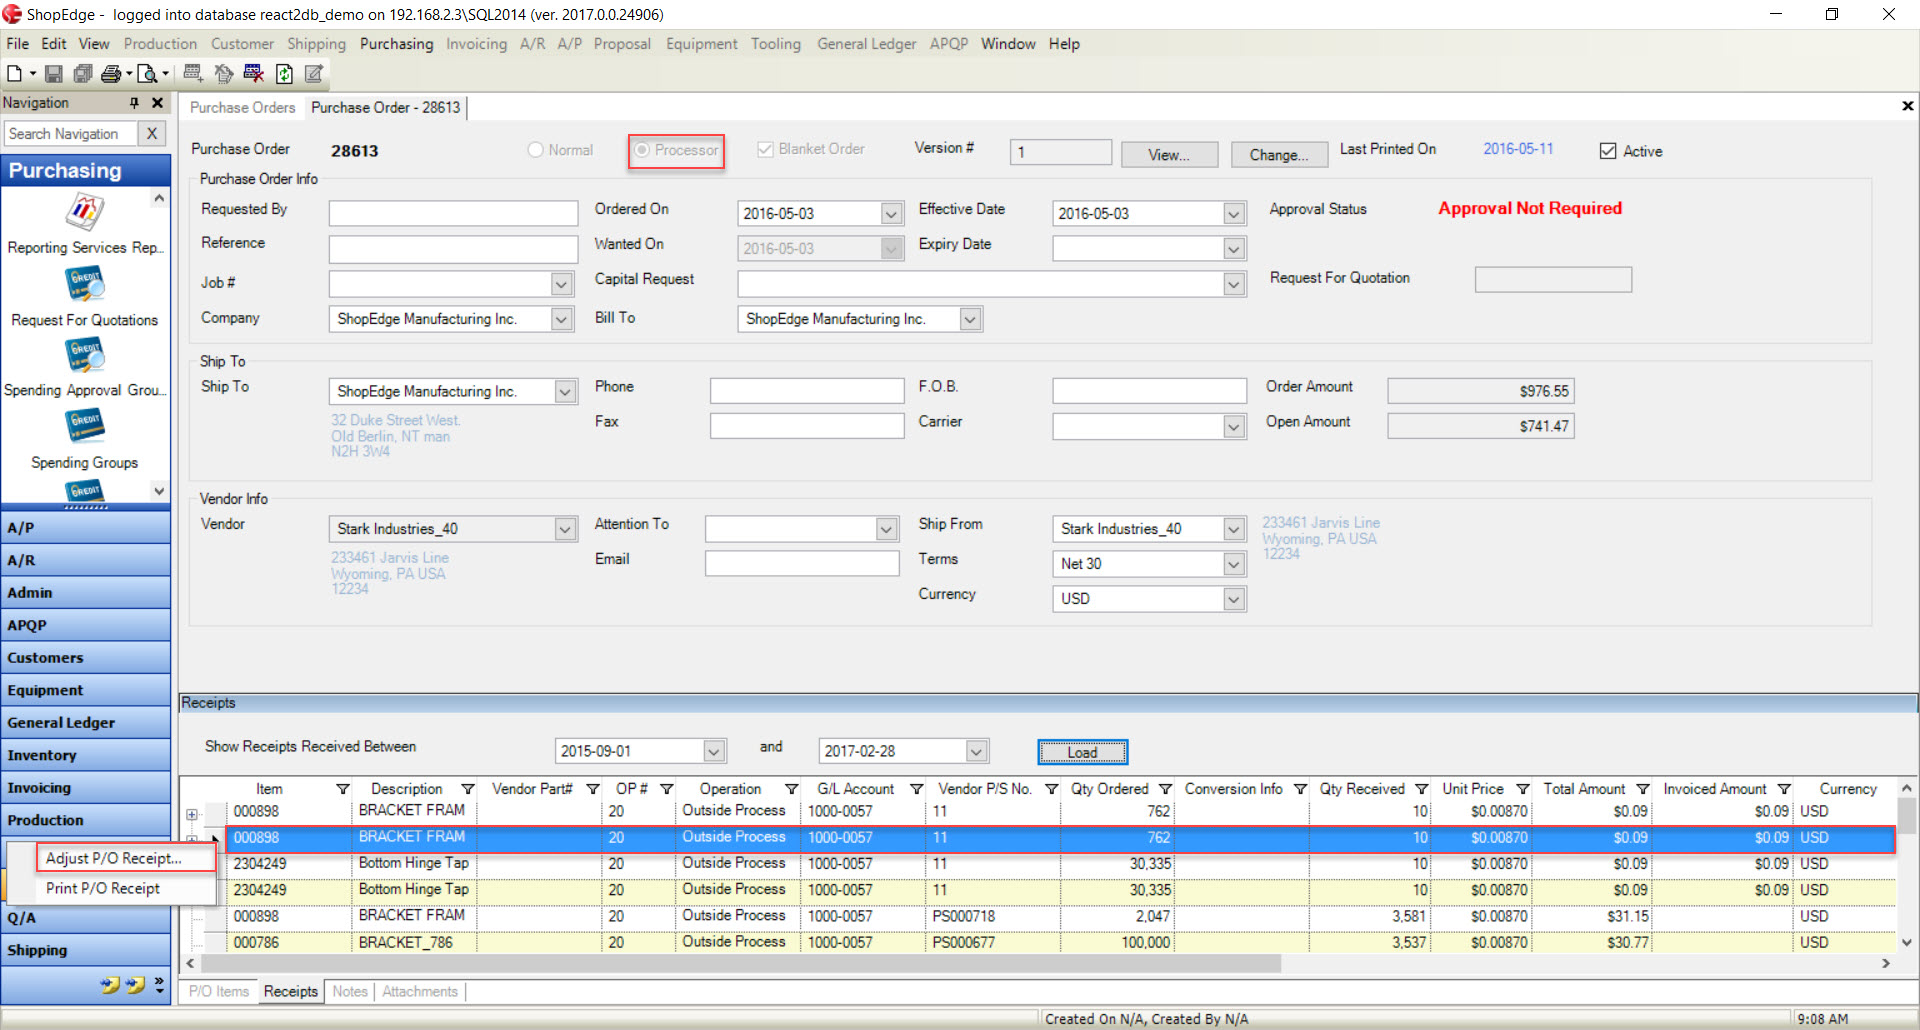
The Adjust P/O Receipt window will appear.

Users can now make the necessary changes to adjust the Processor P/O Receipt such as entering a correct value in the Unit Price textbox. Once the necessary adjustments have been made, click on the
 button.
Then, users must run the Month End Accrual Report again. The adjustments will be made.
Deleting Purchase Order Receipts
To delete a Normal/Processor P/O Receipt, navigate to the  tab and click on the
 ![]() icon.
icon.
The Purchase Orders screen will be displayed.

Locate the Purchase Order that you wish to delete a Receipt from and double-click on the appropriate row. The Purchase Order detail screen will appear.
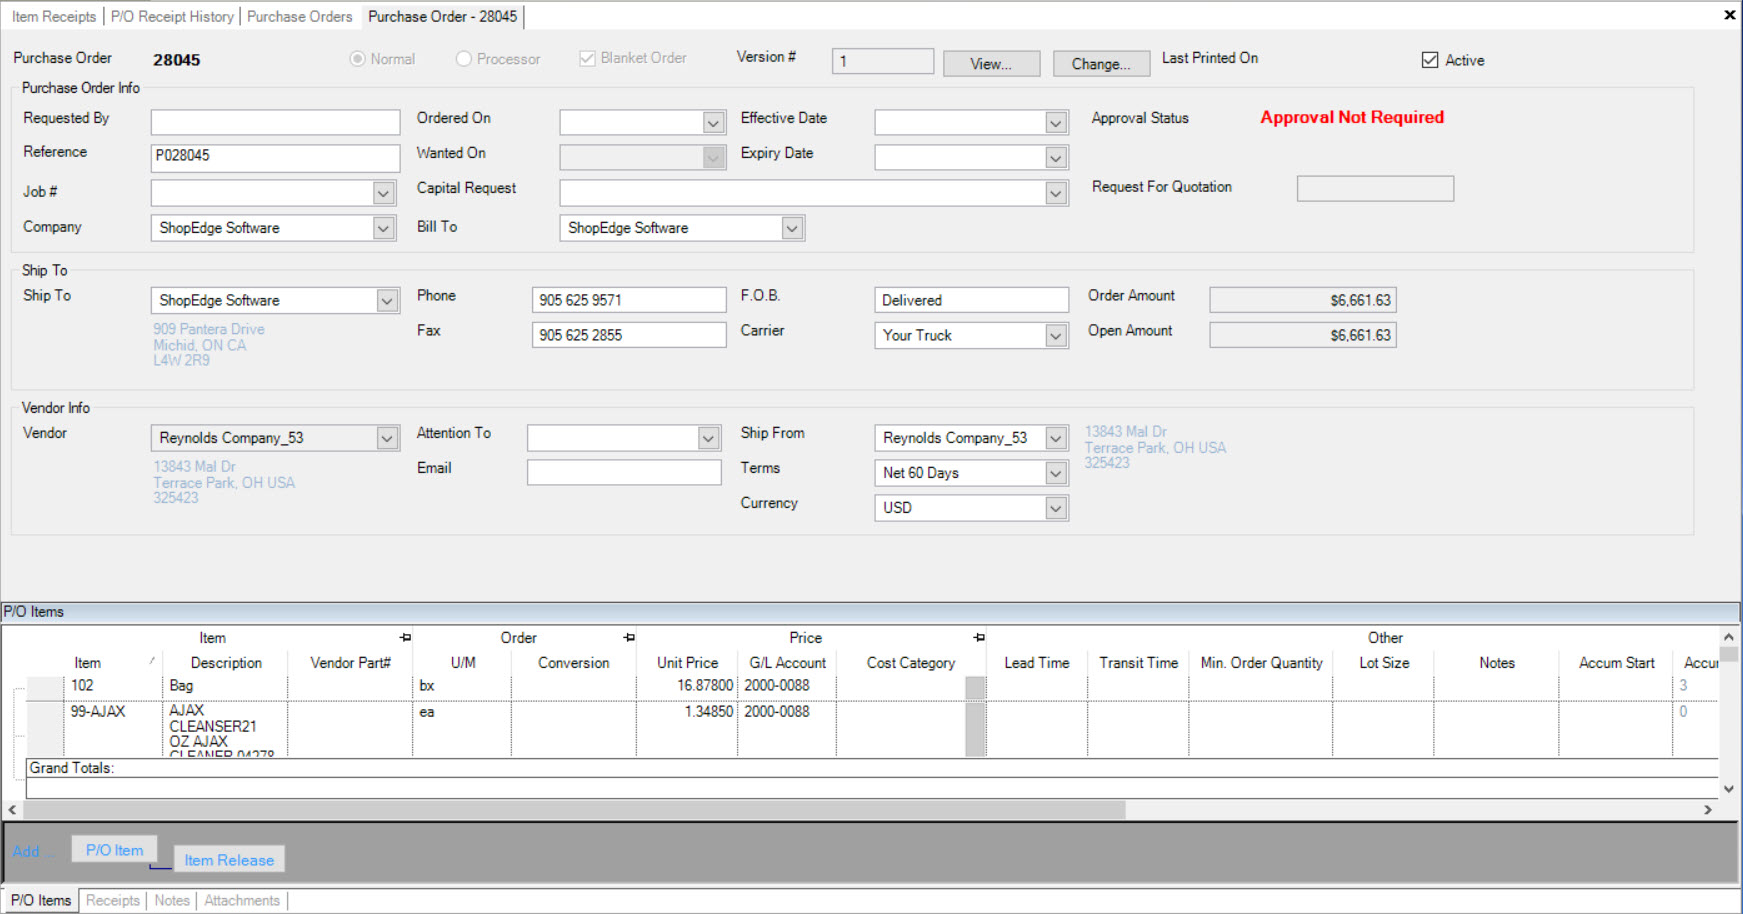
Click on the  tab located at the bottom of the screen.
Enter in a Start and End date in order for the system to populate the P/O Receipts received between the two dates. Then, click on the  button.
Locate the P/O Receipt you wish to delete and highlight the appropriate row. Then, click on the  button located at the top of the screen.
A Confirmation window will appear confirming that you wish to delete the selected P/O Receipt. Click on the  button to confirm.
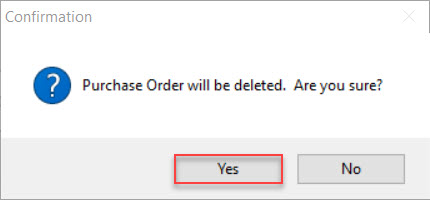
The selected P/O Receipt will be deleted. Make sure to save your changes before exiting the screen.
Printing a Purchase Order Receipt
To print a P/O Receipt from the Purchase Order detail screen, navigate to the  tab and click on the
 ![]() icon.
icon.
The Purchase Orders screen will be displayed.

Locate the Purchase Order that you wish to adjust the Receipt for and double-click on the appropriate row. The Purchase Order detail screen will appear.
Click on the  tab located at the bottom of the screen.
Enter in a Start and End date in order for the system to populate the P/O Receipts received between the two dates. Then, click on the  button.
Locate the P/O Receipt you wish to print and right-click on the appropriate row. A menu will appear where users can select the Print P/O Receipt option.

The Print window will appear where users can select the appropriate Printer and Printer Settings. Once this is done, click on the  button to print.
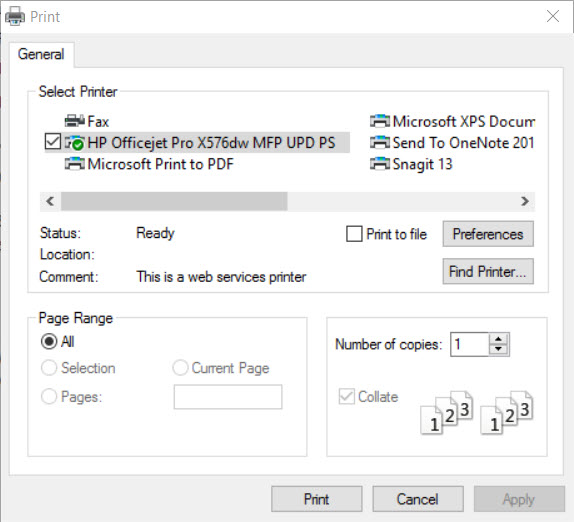
The selected P/O Receipt will be printed.
Purchase Order Notes
To view, add, edit, or delete Purchase Order notes, navigate to the  tab and click on the
 ![]() icon.
icon.
The Purchase Orders screen will be displayed.

Locate the Purchase Order that you wish to view, add, edit, or delete notes from and double-click on the appropriate row. The Purchase Order detail screen will appear.

Make sure to select the  tab located at the bottom of the screen.
Users then have the ability to add, edit, or delete any Purchase Order notes using the available textbox.
Make sure to save your changes before exiting the screen.
Purchase Order Attachments
To view, add, or remove Purchase Order attachments, navigate to the  tab and click on the
 ![]() icon.
icon.
The Purchase Orders screen will be displayed.

Locate the Purchase Order that you wish to view, add, or remove attachments from and double-click on the appropriate row. The Purchase Order detail screen will appear.

Make sure to select the  tab located at the bottom of the screen.
To add an attachment, simply click on the  button. The system will allow users to select an attachment for the Purchase Order from their computer. Once
an attachment has been selected, click on the
  button.
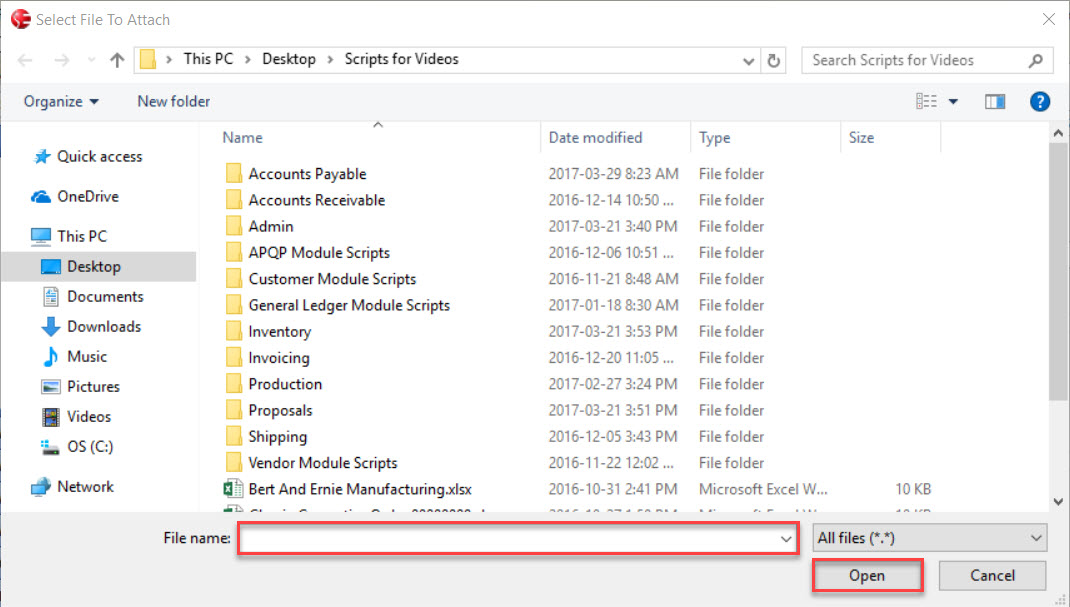
The attachment will be added to the Purchase Order under the  tab.
tab.
Make sure to save your changes before exiting the screen.
To delete an attachment from a Purchase Order, locate the attachment you wish to delete and highlight the appropriate row. Use your delete key and when the system prompts you, select Yes.

The selected attachment will be deleted from the Purchase Order.
Make sure to save your changes before exiting the screen.
Opening an existing Purchase Order
To open an existing Purchase Order, navigate to the  tab and click on the
 ![]() icon.
icon.
The Purchase Orders screen will be displayed.

Locate the Purchase Order that you wish to view and double-click on the appropriate row. The Purchase Order detail screen will appear.

Printing a Delivery Schedule
To print a Delivery Schedule from a Purchase Order detail screen, navigate to the  tab and click on the
 ![]() icon. The Purchase Orders screen will be displayed.
icon. The Purchase Orders screen will be displayed.

Locate the Purchase Order that you wish to print a Delivery Schedule from and double-click on the appropriate row. The Purchase Order detail screen will appear.

Click on the Purchasing tab located at the top of the screen. Select Print and then click on the Delivery Schedule... option.
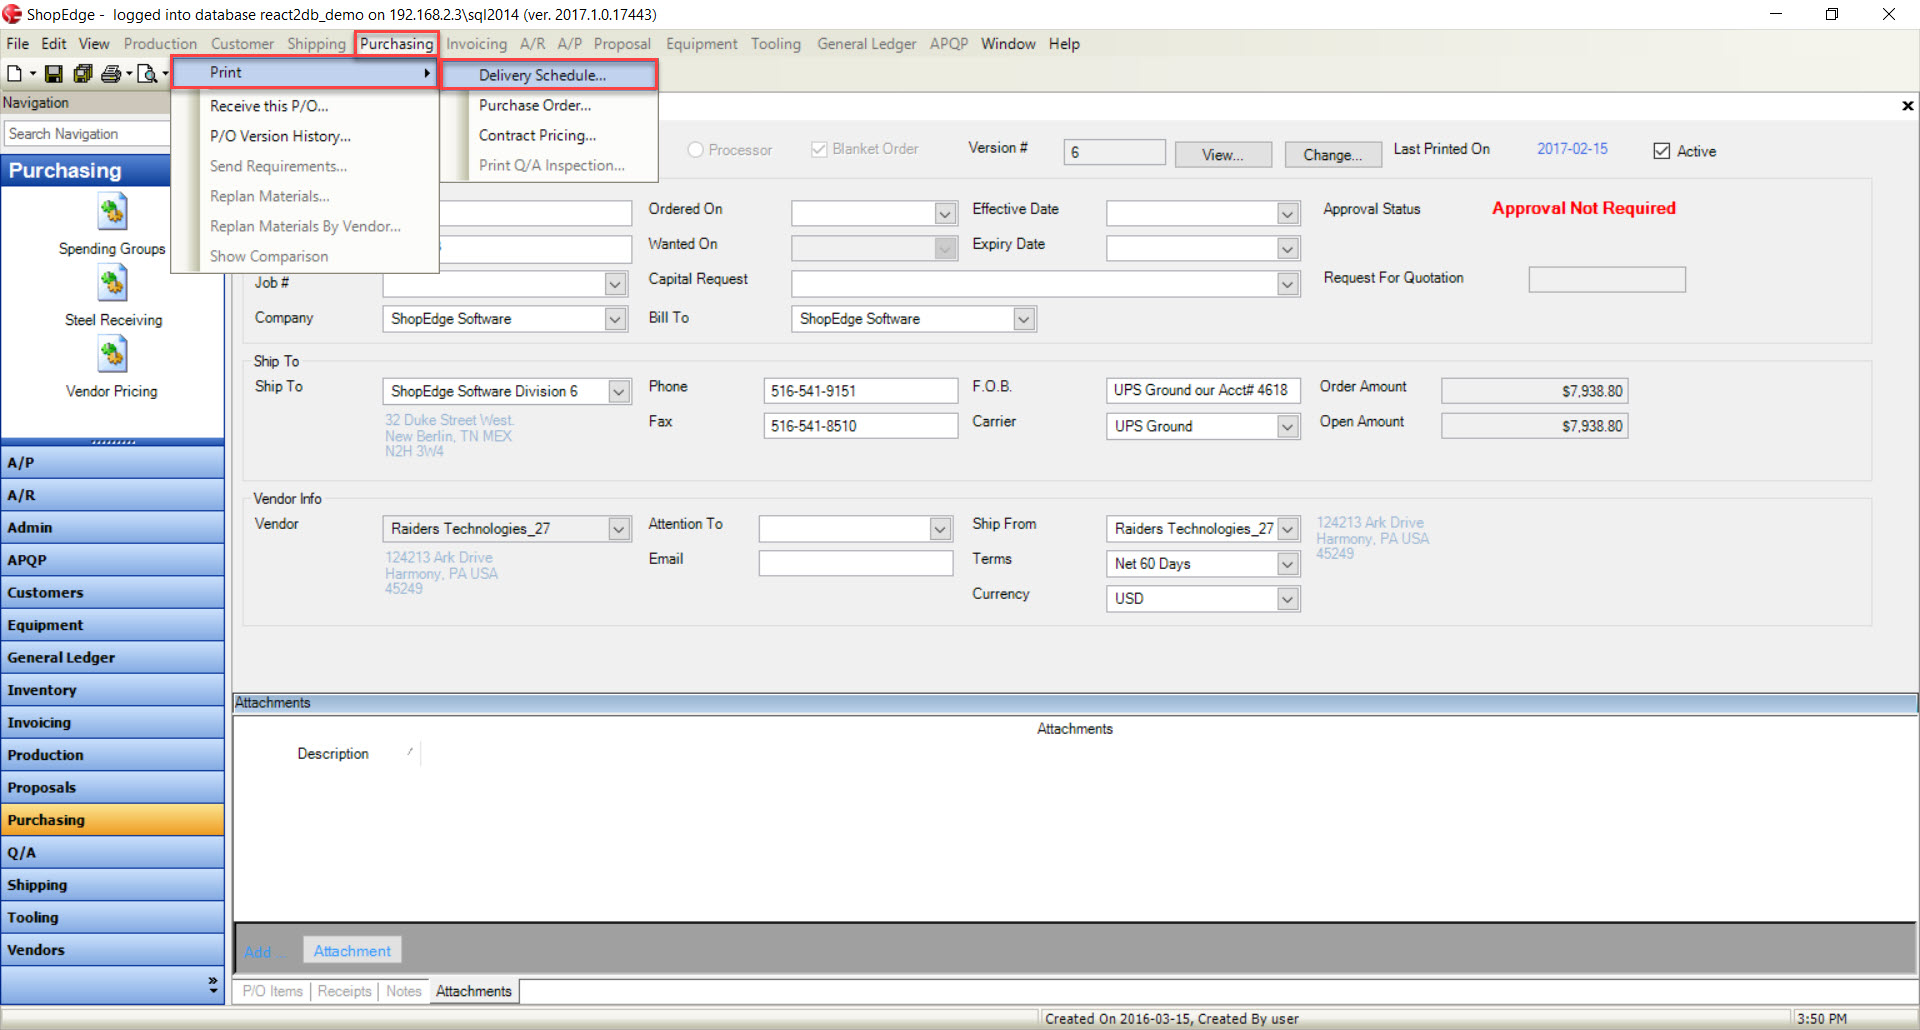
The Print window will appear where users can select the appropriate Printer and Printer Settings. Once this is done, click on the  button to print.

The Delivery Schedule for the selected Purchase Order will be printed.
Printing a Purchase Order
To print a Purchase Order, navigate to the  tab and click on the
 ![]() icon. The Purchase Orders screen will be displayed.
icon. The Purchase Orders screen will be displayed.

Locate the Purchase Order that you wish to print and double-click on the appropriate row. The Purchase Order detail screen will appear.

Click on the Purchasing tab located at the top of the screen. Select Print and then click on the Purchase Order... option.
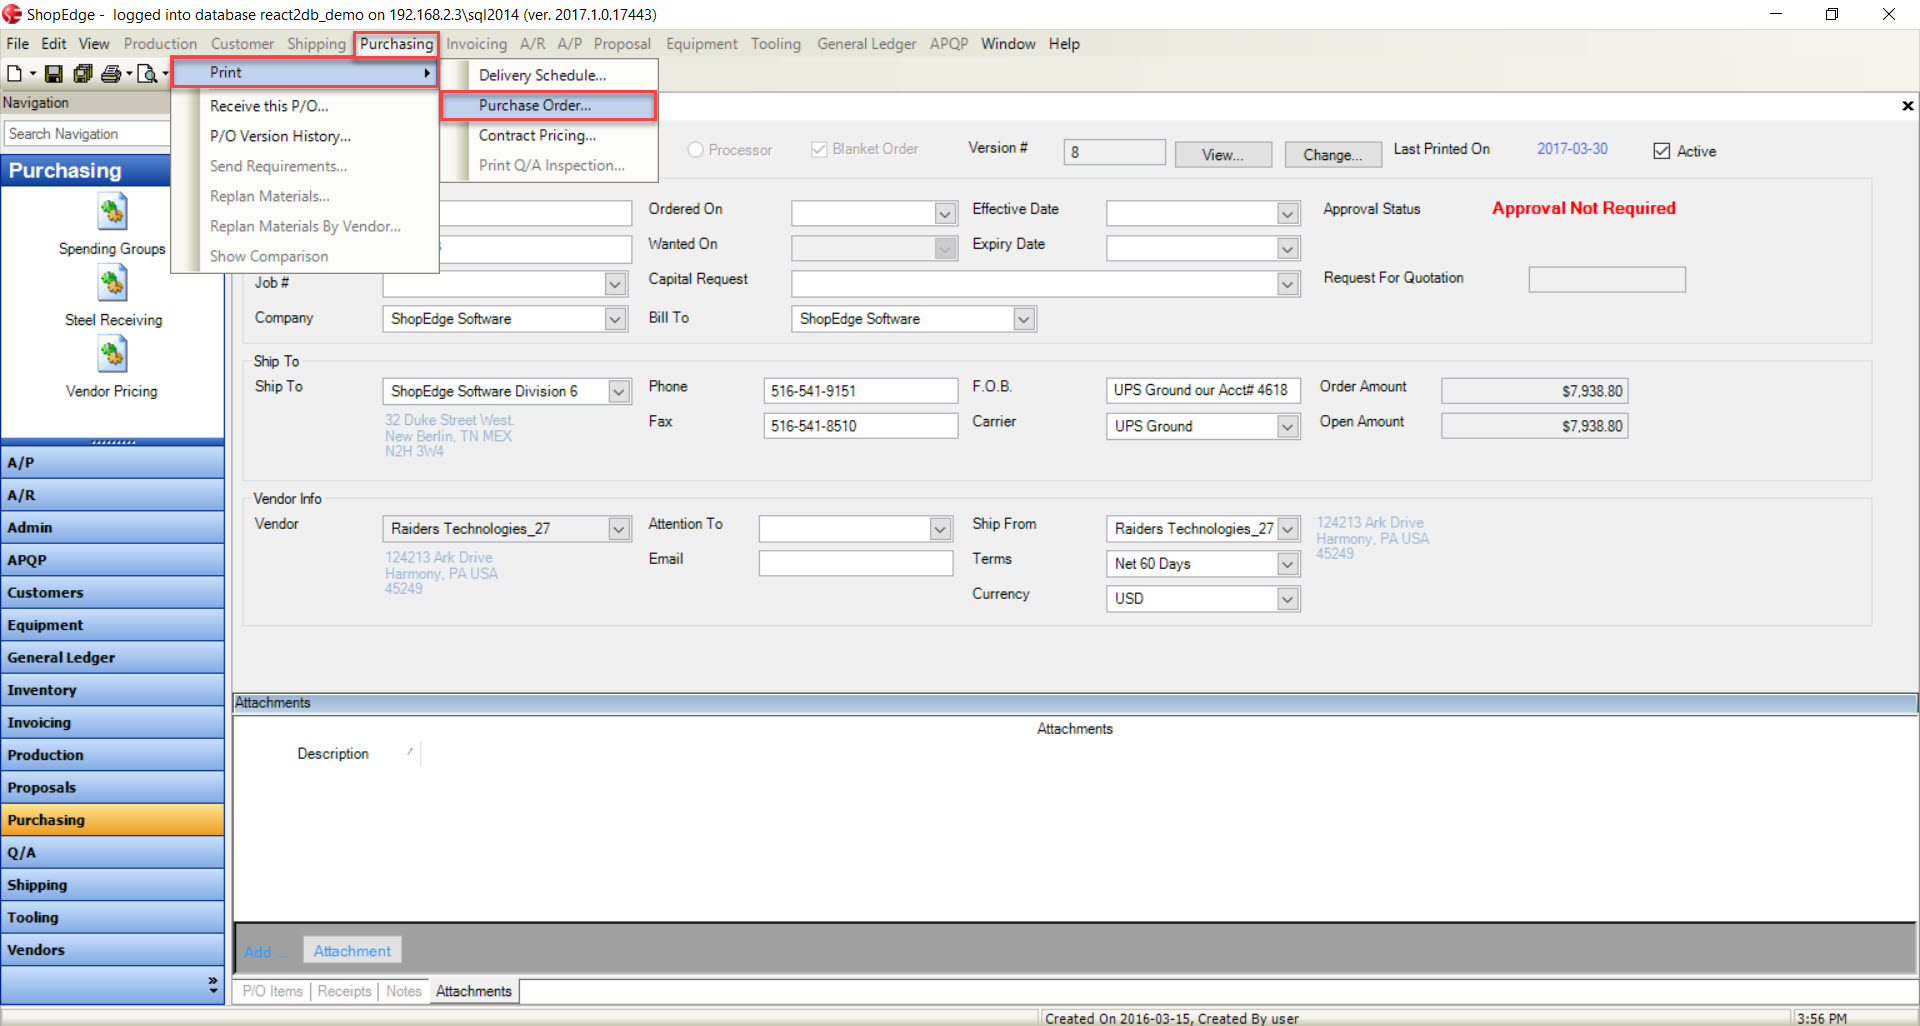
The Print window will appear where users can select the appropriate Printer and Printer Settings. Once this is done, click on the  button to print.

The Purchase Order will be printed.
Printing a Contract Pricing
To print a Contract Pricing, navigate to the  tab and click on the
 ![]() icon. The Purchase Orders screen will be displayed.
icon. The Purchase Orders screen will be displayed.

Locate the Purchase Order that you wish to print a Contract Pricing from and double-click on the appropriate row. The Purchase Order detail screen will appear.

Click on the Purchasing tab located at the top of the screen. Select Print and then click on the Contract Pricing... option.
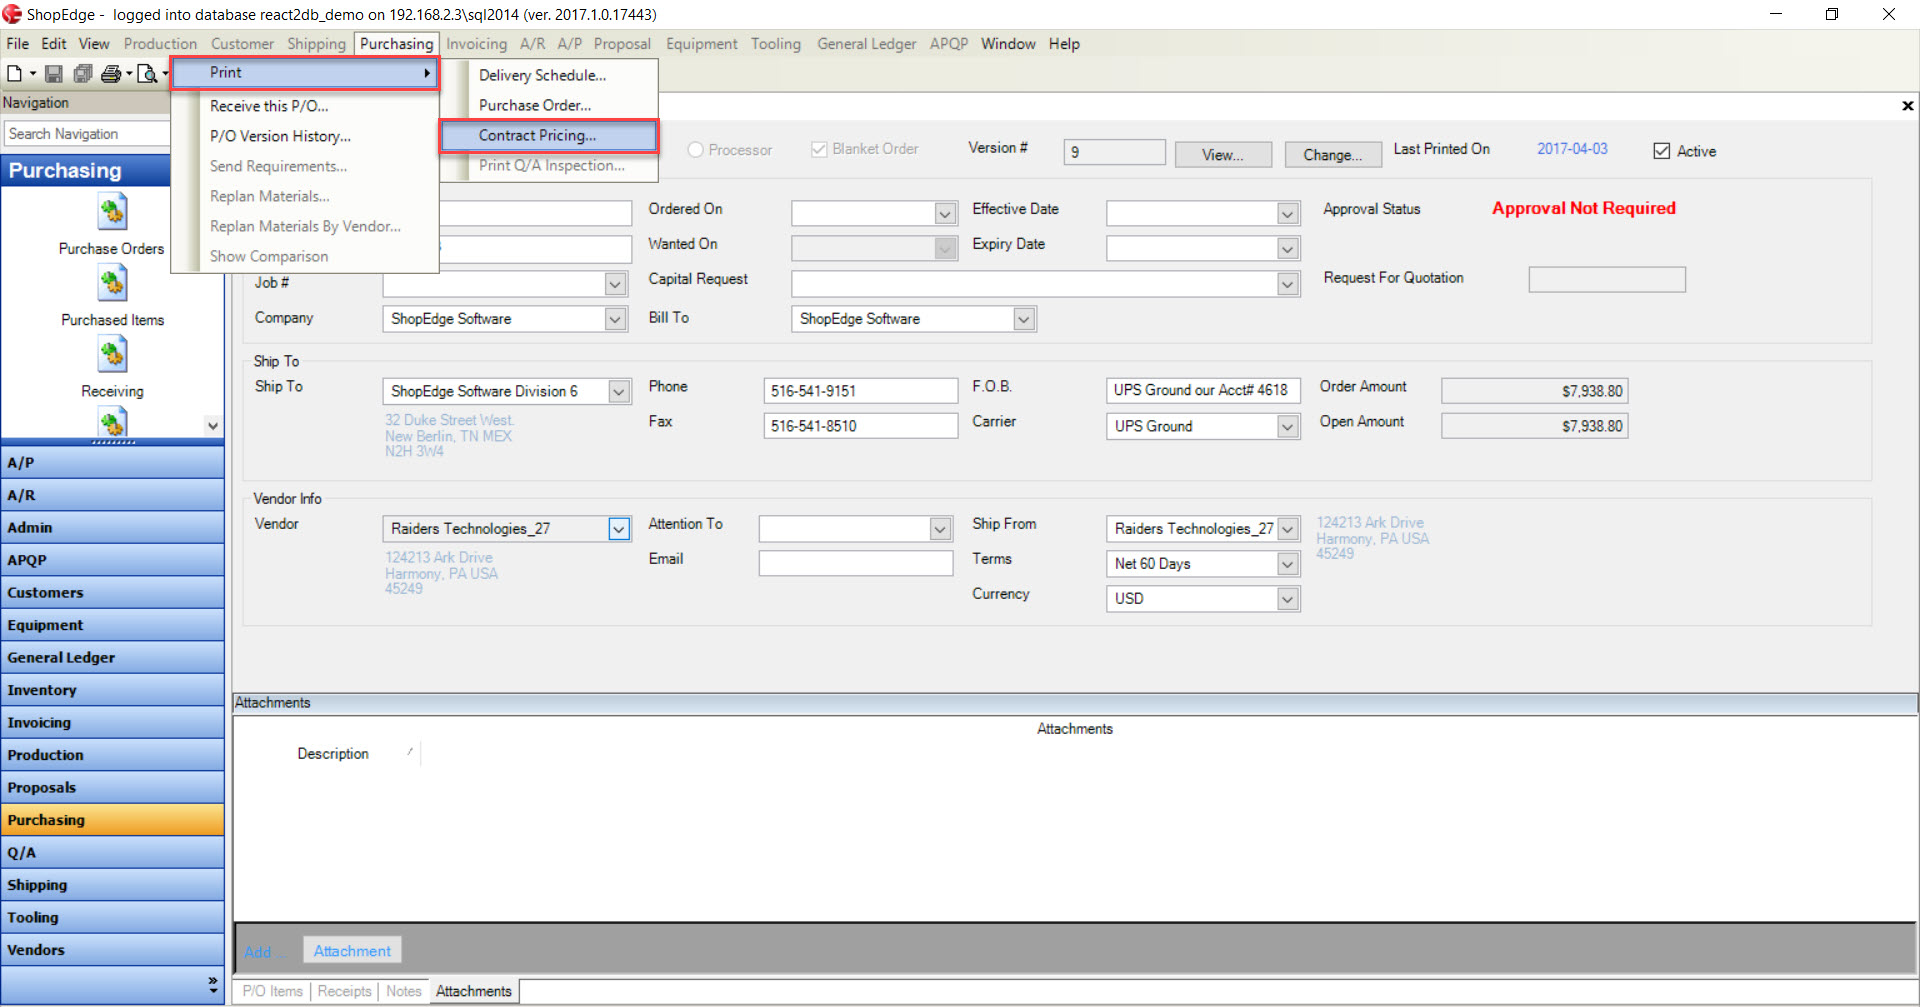
The Print window will appear where users can select the appropriate Printer and Printer Settings. Once this is done, click on the  button to print.

The Contract Pricing for the selected Purchase Order will be printed.
Receiving a Purchase Order
To receive a Purchase Order, navigate to the  tab and click on the
 ![]() icon. The Purchase Orders screen will be displayed.
icon. The Purchase Orders screen will be displayed.

Locate the Purchase Order that you wish to receive and double-click on the appropriate row. The Purchase Order detail screen will appear.

Click on the Purchasing tab located at the top of the screen. Select the Receive this P/O... option.
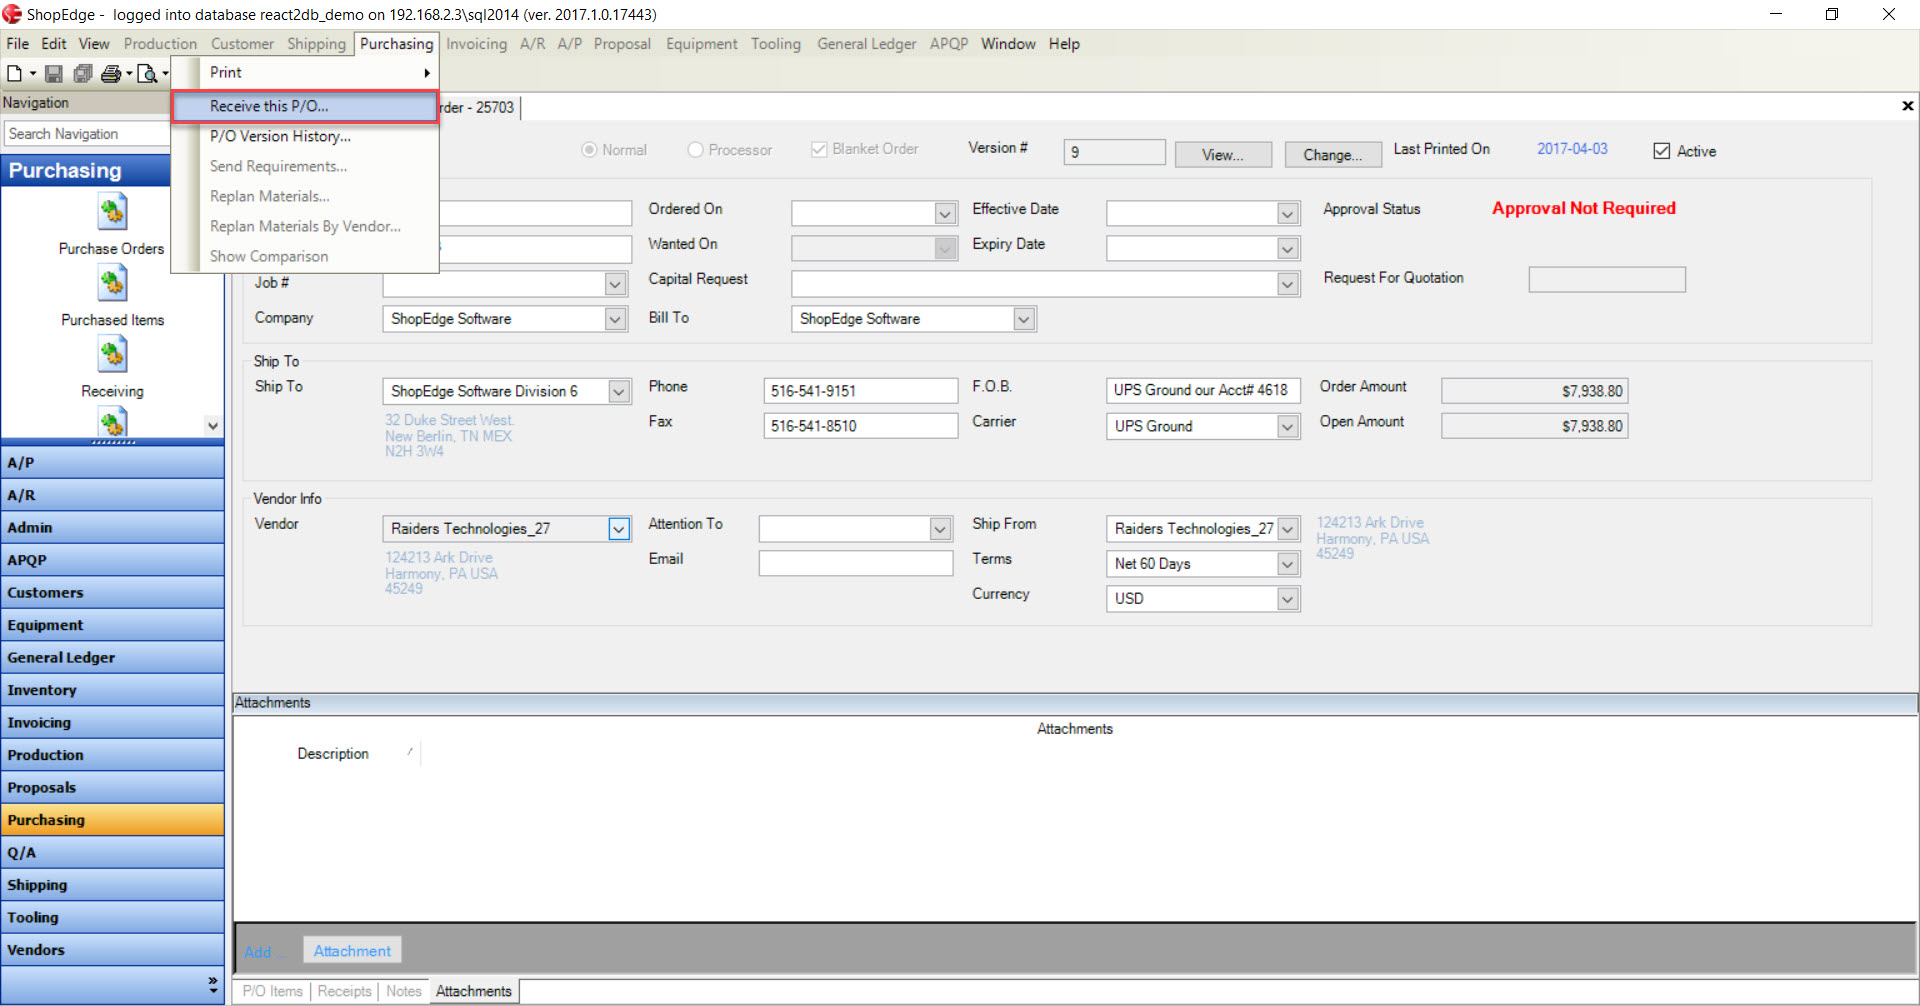
The P/O Receiving detail screen will open. Users must select who the Purchase Order is being Received By.
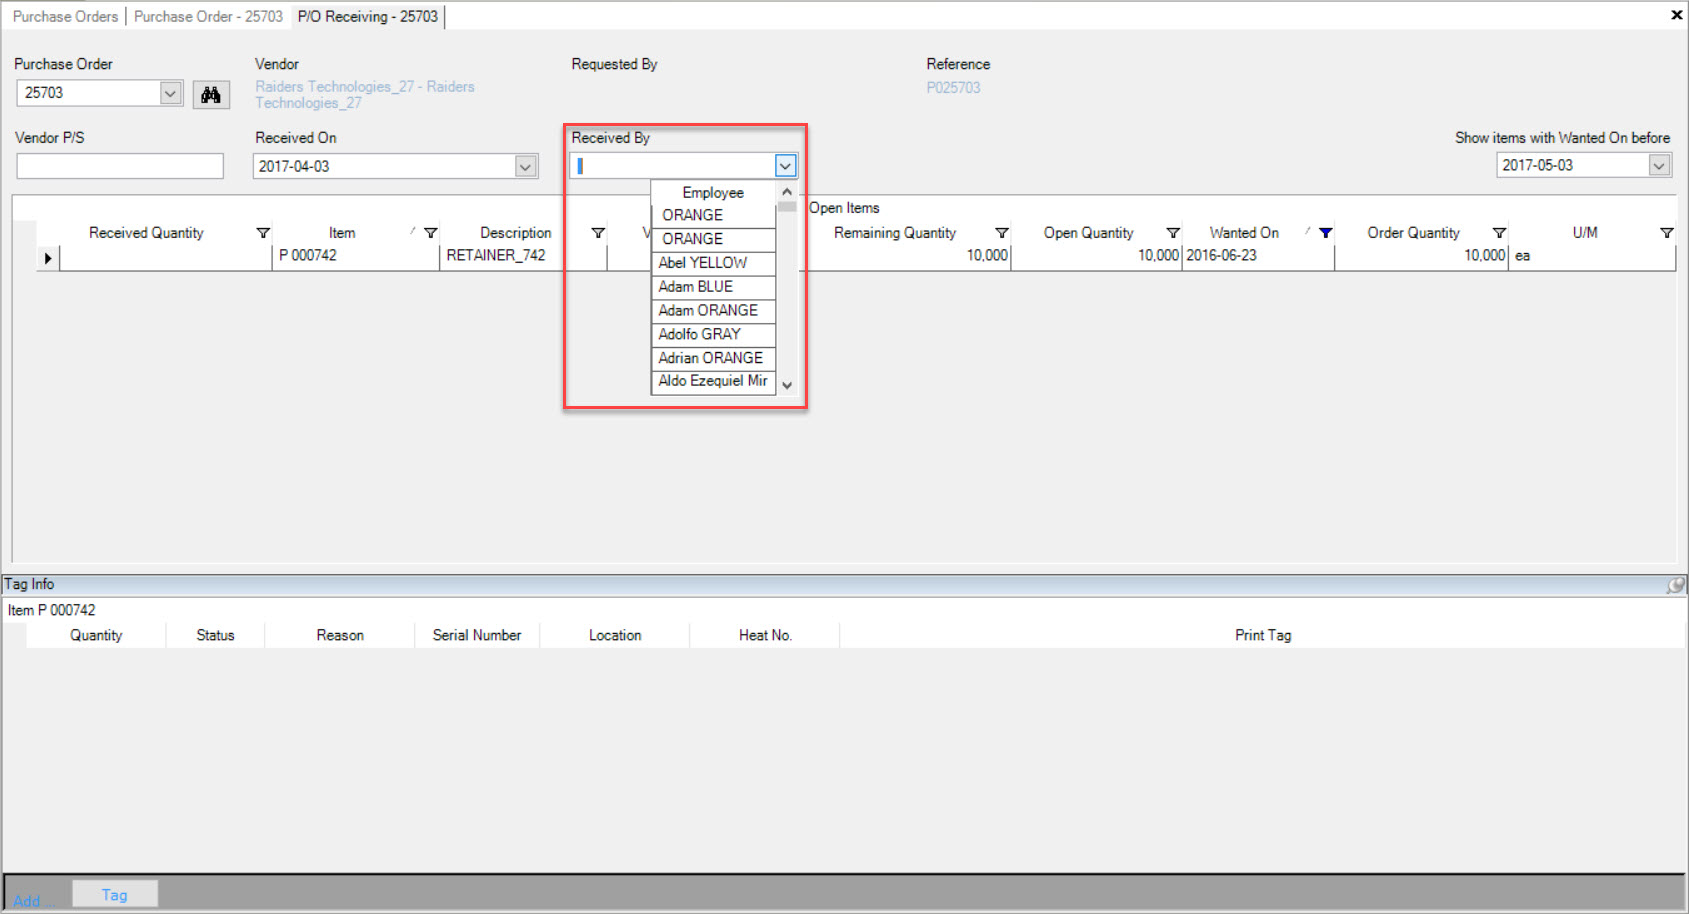
Make sure to save your changes before exiting the screen.
P/O Version History
To view or print the P/O Version History, navigate to the  tab and click on the
 ![]() icon. The Purchase Orders screen will be displayed.
icon. The Purchase Orders screen will be displayed.

Locate the Purchase Order that you wish to view or print the Version History from and double-click on the appropriate row. The Purchase Order detail screen will appear.

Click on the Purchasing tab located at the top of the screen. Select the P/O Version History option.
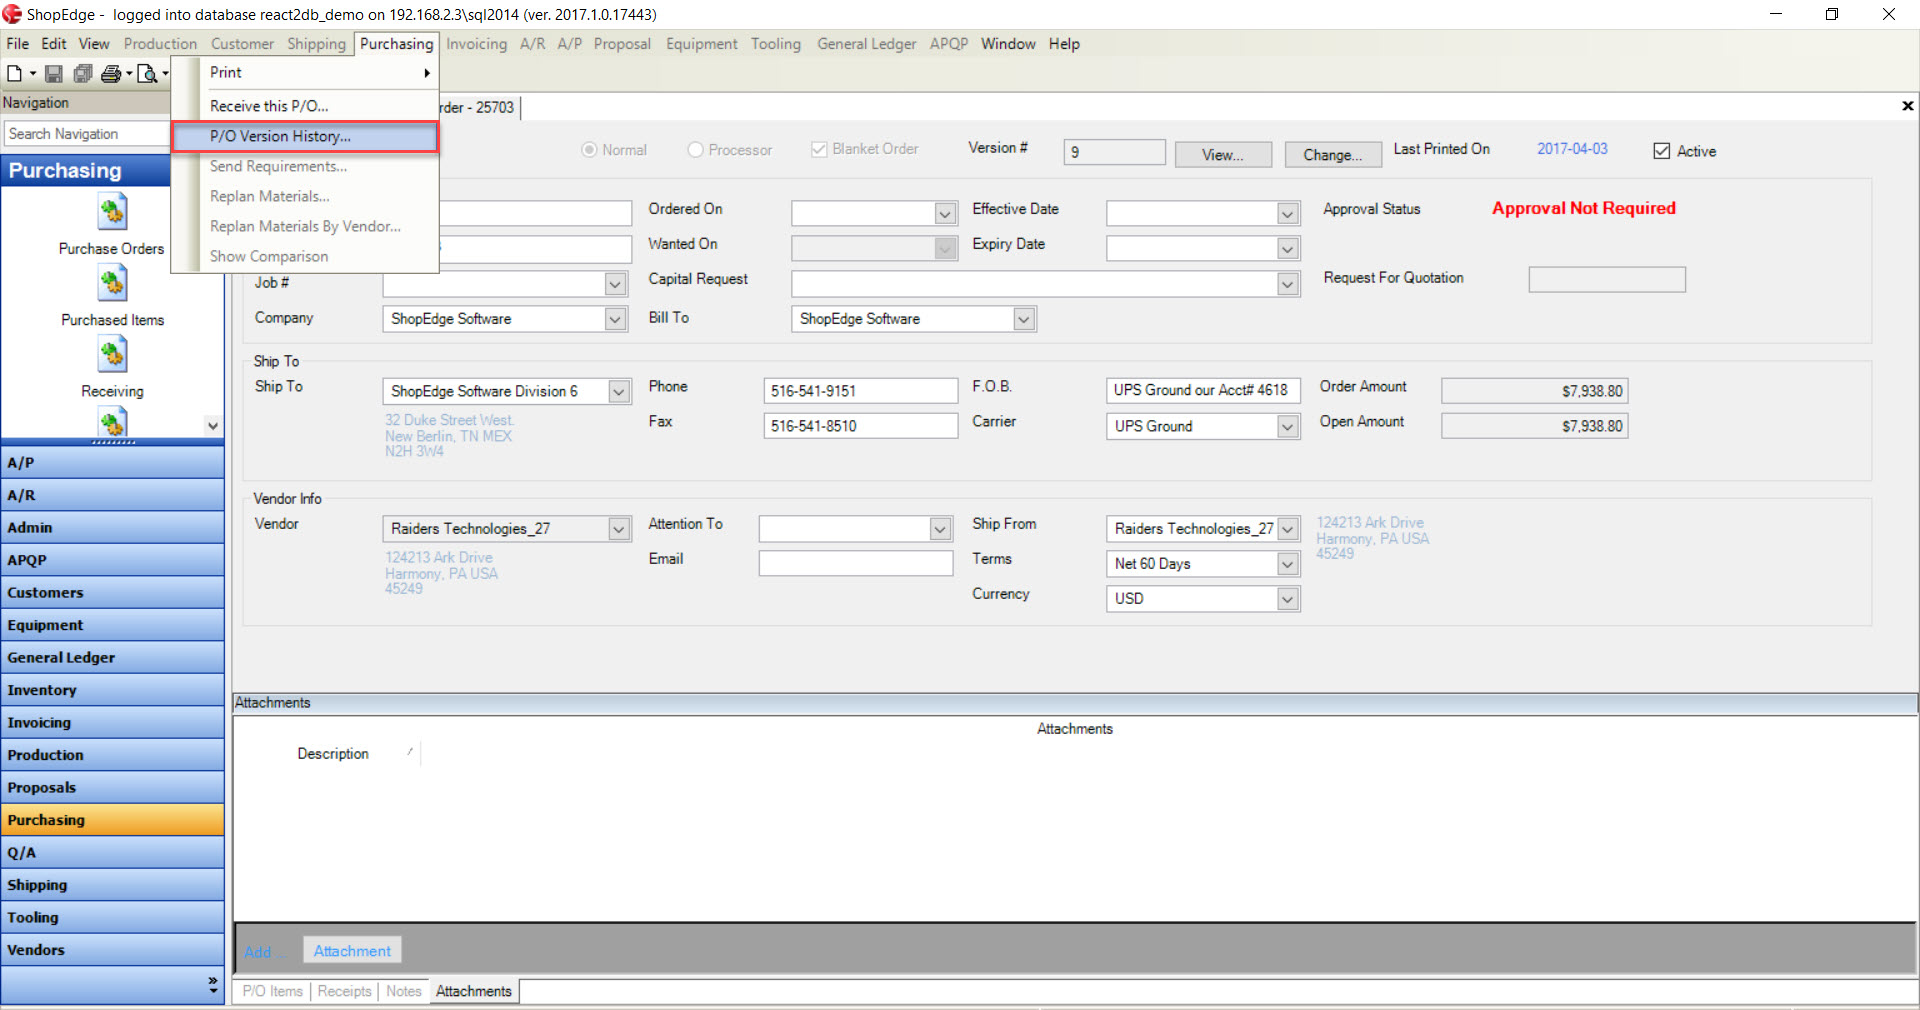
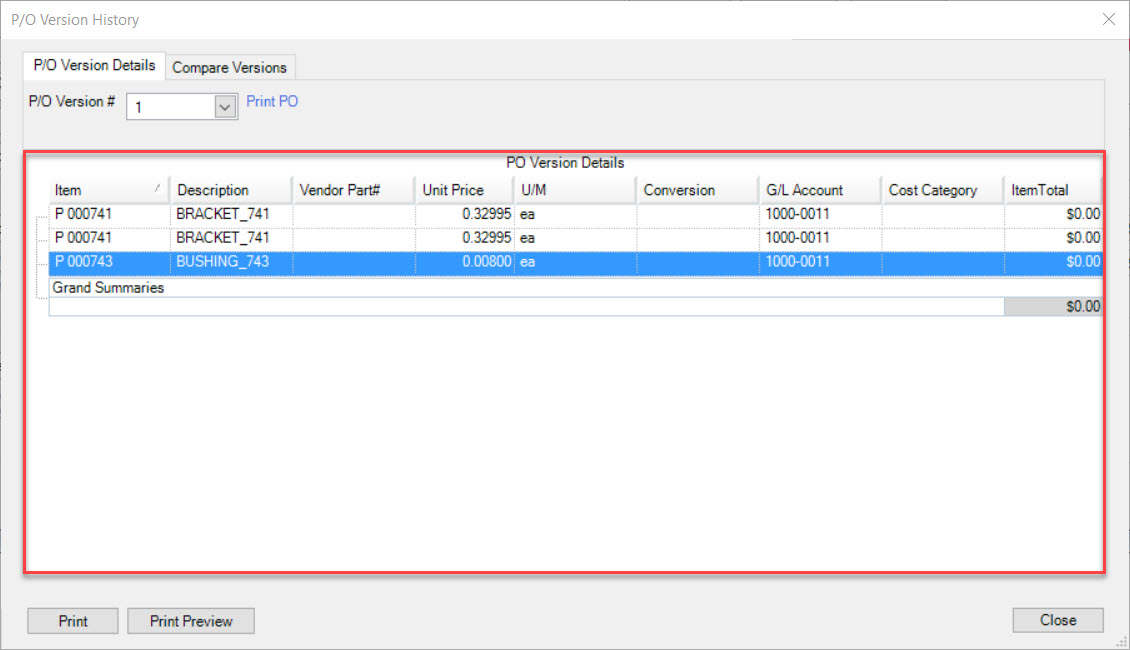
The P/O Version History window will appear. Users must select a P/O Version # from the available drop-down menu.
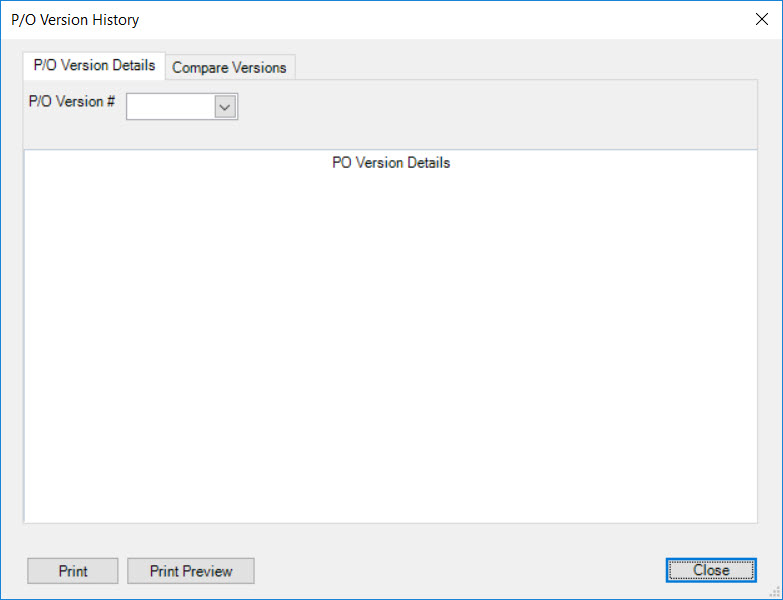
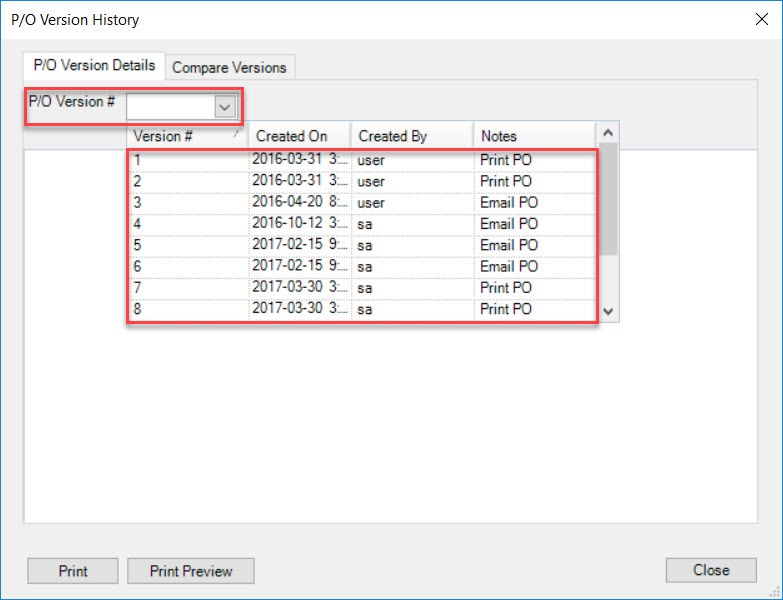
The system will then populate the P/O Version Details.
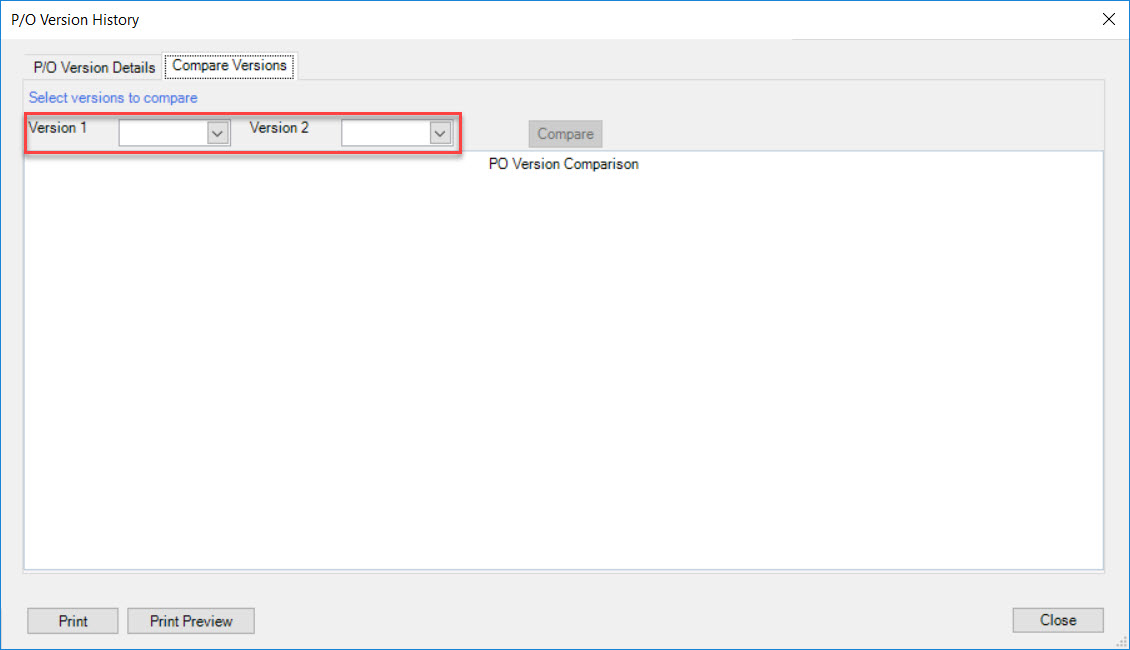
Users also have the ability to compare P/O Version Histories by clicking on the  tab.
tab.
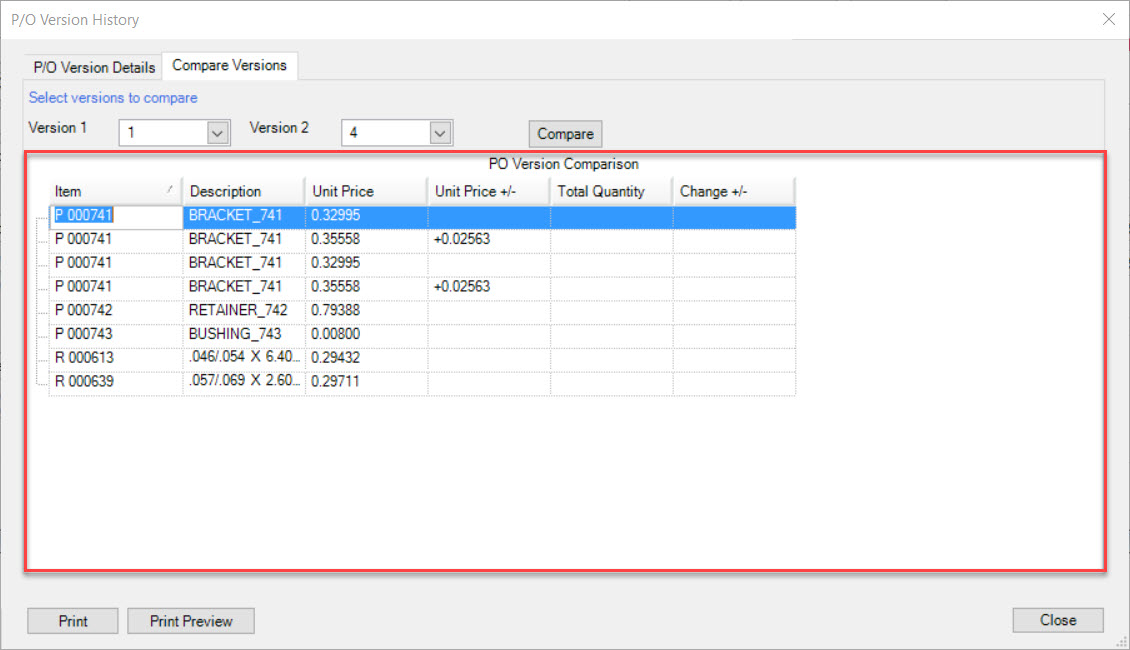
Users must then select Version 1 and Version 2 using the available drop-down menus to compare and then, click on the  button.
The system will populate the comparison between the two selected Versions.
Users also have the ability to print P/O Version History by clicking on the  button.
The Print window will appear where users can select the appropriate Printer and Printer Settings. Once this is done, click on the  button to print.

The P/O Version History for the selected Purchase Order will be printed.